使用Colab来加速Donkey Car训练 (Tensorflow GPU)

本notebook助你快速训练你的Donkey car或者自动驾驶小车模型。
参考并改进了@sachindroid8的notebook,先向前人致敬!
先说说使用Colab进行训练的优缺点
- 效率
使用Colab需要梯子,也要把数据传给google,上传时间因人而异,我上传大概花来2-3分钟,剩下就是执行代码和训练。第一执行代码需要搞懂什么原理,后面执行基本不用花什么时间,然而使用GPU训练时间,我有6k图片,训练30-40个Epoch左右提前结束,训练时间少于1分钟!每个Epoch只需1-2秒。
然后使用我的Macbook Pro训练,因为没有GPU的缘故,每个Epoc需要30-50秒,训练下来,接近40分钟到1小时才能完成。
- 便利性
如果没有梯子,当然Colab不是一个选择,我知道百度也提供一些有限度免费的服务器,以后可以再做测试,但有梯子的话,Google Colab是最好的选择。下面便开始教你怎样开始训练
载入我的Notebook
安装 TensorFlow 1.14.0
TensorFlow 2.x和Donkey Car 3.x现在还有兼容性问题,暂时不推荐使用(2019.8.17)In [1]:
!pip install tensorflow-gpu==1.14.0
Collecting tensorflow-gpu==1.14.0
  Downloading https://files.pythonhosted.org/packages/76/04/43153bfdfcf6c9a4c38ecdb971ca9a75b9a791bb69a764d652c359aca504/tensorflow_gpu-1.14.0-cp36-cp36m-manylinux1_x86_64.whl (377.0MB)
     |████████████████████████████████| 377.0MB 86kB/s
Requirement already satisfied: grpcio>=1.8.6 in /usr/local/lib/python3.6/dist-packages (from tensorflow-gpu==1.14.0) (1.15.0)
Requirement already satisfied: absl-py>=0.7.0 in /usr/local/lib/python3.6/dist-packages (from tensorflow-gpu==1.14.0) (0.7.1)
Requirement already satisfied: tensorflow-estimator<1.15.0rc0,>=1.14.0rc0 in /usr/local/lib/python3.6/dist-packages (from tensorflow-gpu==1.14.0) (1.14.0)
Requirement already satisfied: wrapt>=1.11.1 in /usr/local/lib/python3.6/dist-packages (from tensorflow-gpu==1.14.0) (1.11.2)
Requirement already satisfied: termcolor>=1.1.0 in /usr/local/lib/python3.6/dist-packages (from tensorflow-gpu==1.14.0) (1.1.0)
Requirement already satisfied: astor>=0.6.0 in /usr/local/lib/python3.6/dist-packages (from tensorflow-gpu==1.14.0) (0.8.0)
Requirement already satisfied: keras-applications>=1.0.6 in /usr/local/lib/python3.6/dist-packages (from tensorflow-gpu==1.14.0) (1.0.8)
Requirement already satisfied: tensorboard<1.15.0,>=1.14.0 in /usr/local/lib/python3.6/dist-packages (from tensorflow-gpu==1.14.0) (1.14.0)
Requirement already satisfied: wheel>=0.26 in /usr/local/lib/python3.6/dist-packages (from tensorflow-gpu==1.14.0) (0.33.4)
Requirement already satisfied: protobuf>=3.6.1 in /usr/local/lib/python3.6/dist-packages (from tensorflow-gpu==1.14.0) (3.7.1)
Requirement already satisfied: six>=1.10.0 in /usr/local/lib/python3.6/dist-packages (from tensorflow-gpu==1.14.0) (1.12.0)
Requirement already satisfied: keras-preprocessing>=1.0.5 in /usr/local/lib/python3.6/dist-packages (from tensorflow-gpu==1.14.0) (1.1.0)
Requirement already satisfied: google-pasta>=0.1.6 in /usr/local/lib/python3.6/dist-packages (from tensorflow-gpu==1.14.0) (0.1.7)
Requirement already satisfied: gast>=0.2.0 in /usr/local/lib/python3.6/dist-packages (from tensorflow-gpu==1.14.0) (0.2.2)
Requirement already satisfied: numpy<2.0,>=1.14.5 in /usr/local/lib/python3.6/dist-packages (from tensorflow-gpu==1.14.0) (1.16.4)
Requirement already satisfied: h5py in /usr/local/lib/python3.6/dist-packages (from keras-applications>=1.0.6->tensorflow-gpu==1.14.0) (2.8.0)
Requirement already satisfied: markdown>=2.6.8 in /usr/local/lib/python3.6/dist-packages (from tensorboard<1.15.0,>=1.14.0->tensorflow-gpu==1.14.0) (3.1.1)
Requirement already satisfied: werkzeug>=0.11.15 in /usr/local/lib/python3.6/dist-packages (from tensorboard<1.15.0,>=1.14.0->tensorflow-gpu==1.14.0) (0.15.5)
Requirement already satisfied: setuptools>=41.0.0 in /usr/local/lib/python3.6/dist-packages (from tensorboard<1.15.0,>=1.14.0->tensorflow-gpu==1.14.0) (41.0.1)
Installing collected packages: tensorflow-gpu
Successfully installed tensorflow-gpu-1.14.0
检查GPU是否有效
如果显示”Found GPU at: / device: GPU: 0“,则GPU可以正常使用
如果没有以上输出,需要检查Runtime (运行类型)是否选择了GPU硬件加速器In [2]:
device_name = tf.test.gpu_device_name()
if device_name != '/device:GPU:0':
raise SystemError('GPU device not found')
print('Found GPU at: {}'.format(device_name))
Found GPU at: /device:GPU:0
克隆Donkey respository
In [3]:
!git clone https://github.com/autorope/donkeycar.git donkey
Cloning into 'donkey'...
remote: Enumerating objects: 120, done.
remote: Counting objects: 100% (120/120), done.
remote: Compressing objects: 100% (76/76), done.
remote: Total 10558 (delta 65), reused 73 (delta 31), pack-reused 10438
Receiving objects: 100% (10558/10558), 58.74 MiB | 46.70 MiB/s, done.
Resolving deltas: 100% (6528/6528), done.
安装 Donkey car
In [4]:
Obtaining file:///content/donkey
Requirement already satisfied: numpy in /usr/local/lib/python3.6/dist-packages (from donkeycar==3.1.0) (1.16.4)
Requirement already satisfied: pillow in /usr/local/lib/python3.6/dist-packages (from donkeycar==3.1.0) (4.3.0)
Requirement already satisfied: docopt in /usr/local/lib/python3.6/dist-packages (from donkeycar==3.1.0) (0.6.2)
Requirement already satisfied: tornado in /usr/local/lib/python3.6/dist-packages (from donkeycar==3.1.0) (4.5.3)
Requirement already satisfied: requests in /usr/local/lib/python3.6/dist-packages (from donkeycar==3.1.0) (2.21.0)
Requirement already satisfied: h5py in /usr/local/lib/python3.6/dist-packages (from donkeycar==3.1.0) (2.8.0)
Requirement already satisfied: moviepy in /usr/local/lib/python3.6/dist-packages (from donkeycar==3.1.0) (0.2.3.5)
Requirement already satisfied: pandas in /usr/local/lib/python3.6/dist-packages (from donkeycar==3.1.0) (0.24.2)
Requirement already satisfied: PrettyTable in /usr/local/lib/python3.6/dist-packages (from donkeycar==3.1.0) (0.7.2)
Collecting paho-mqtt (from donkeycar==3.1.0)
  Downloading https://files.pythonhosted.org/packages/25/63/db25e62979c2a716a74950c9ed658dce431b5cb01fde29eb6cba9489a904/paho-mqtt-1.4.0.tar.gz (88kB)
     |████████████████████████████████| 92kB 4.2MB/s
Requirement already satisfied: olefile in /usr/local/lib/python3.6/dist-packages (from pillow->donkeycar==3.1.0) (0.46)
Requirement already satisfied: urllib3<1.25,>=1.21.1 in /usr/local/lib/python3.6/dist-packages (from requests->donkeycar==3.1.0) (1.24.3)
Requirement already satisfied: certifi>=2017.4.17 in /usr/local/lib/python3.6/dist-packages (from requests->donkeycar==3.1.0) (2019.6.16)
Requirement already satisfied: chardet<3.1.0,>=3.0.2 in /usr/local/lib/python3.6/dist-packages (from requests->donkeycar==3.1.0) (3.0.4)
Requirement already satisfied: idna<2.9,>=2.5 in /usr/local/lib/python3.6/dist-packages (from requests->donkeycar==3.1.0) (2.8)
Requirement already satisfied: six in /usr/local/lib/python3.6/dist-packages (from h5py->donkeycar==3.1.0) (1.12.0)
Requirement already satisfied: decorator<5.0,>=4.0.2 in /usr/local/lib/python3.6/dist-packages (from moviepy->donkeycar==3.1.0) (4.4.0)
Requirement already satisfied: tqdm<5.0,>=4.11.2 in /usr/local/lib/python3.6/dist-packages (from moviepy->donkeycar==3.1.0) (4.28.1)
Requirement already satisfied: imageio<3.0,>=2.1.2 in /usr/local/lib/python3.6/dist-packages (from moviepy->donkeycar==3.1.0) (2.4.1)
Requirement already satisfied: pytz>=2011k in /usr/local/lib/python3.6/dist-packages (from pandas->donkeycar==3.1.0) (2018.9)
Requirement already satisfied: python-dateutil>=2.5.0 in /usr/local/lib/python3.6/dist-packages (from pandas->donkeycar==3.1.0) (2.5.3)
Building wheels for collected packages: paho-mqtt
  Building wheel for paho-mqtt (setup.py) ... done
  Created wheel for paho-mqtt: filename=paho_mqtt-1.4.0-cp36-none-any.whl size=48333 sha256=9a67d0c95fae2b9495c20980895d9569ef53859cbc22bb57fc2466d7a581af7b
  Stored in directory: /root/.cache/pip/wheels/82/e5/de/d90d0f397648a1b58ffeea1b5742ac8c77f71fd43b550fa5a5
Successfully built paho-mqtt
Installing collected packages: paho-mqtt, donkeycar
  Running setup.py develop for donkeycar
Successfully installed donkeycar paho-mqtt-1.4.0
创建项目
我使用了mycar作为项目名称,你可以改名,但改名后需要相应修改后面但代码In [5]:
!donkey createcar --path /content/mycar
using donkey v3.1.0 ...
Creating car folder: /content/mycar
making dir  /content/mycar
Creating data & model folders.
making dir  /content/mycar/models
making dir  /content/mycar/data
making dir  /content/mycar/logs
Copying car application template: complete
Copying car config defaults. Adjust these before starting your car.
Copying train script. Adjust these before starting your car.
Copying my car config overrides
Donkey setup complete.
准备数据: 上传data.zip并解压
现在你需要把pi采集回来的data目录上需要训练的目录打包,保存成data.zip.
在pi的data目录上运行:
$ zip -r data.zip tub_3_19-08-17/
然后拷贝会电脑,准备上传到Colab
上传data.zip到Colab
运行下面代码,会出现一个上传按钮,点击上传刚才打包的data.zipIn [7]:
from google.colab import files
if(os.path.exists("/content/data.zip")):
os.remove("/content/data.zip")
if(os.path.exists("/content/mycar/data/data.zip")):
os.remove("/content/mycar/data/data.zip")
uploaded = files.upload()
WORK_FOLDER = "/content/mycar/data/"
if(os.path.exists(WORK_FOLDER) == False):
!mv /content/data.zip /content/mycar/data/
清理已经上传的文件
你需要确保content/mycar/data目录下有tub目录,目录里面有图片和对应的json文件
data.zip就不用保留了In [0]:
!rm /content/mycar/data/data.zip
训练模型
In [21]:
!python /content/mycar/manage.py train --model /content/mycar/models/mypilot.h5
using donkey v3.1.0 ...
loading config file: /content/mycar/config.py
loading personal config over-rides

config loaded
WARNING: Logging before flag parsing goes to stderr.
W0818 04:53:15.944086 140399927523200 deprecation_wrapper.py:119] From /content/donkey/donkeycar/parts/keras.py:18: The name tf.ConfigProto is deprecated. Please use tf.compat.v1.ConfigProto instead.

W0818 04:53:15.944333 140399927523200 deprecation_wrapper.py:119] From /content/donkey/donkeycar/parts/keras.py:18: The name tf.Session is deprecated. Please use tf.compat.v1.Session instead.

2019-08-18 04:53:15.954857: I tensorflow/core/platform/cpu_feature_guard.cc:142] Your CPU supports instructions that this TensorFlow binary was not compiled to use: AVX2 FMA
2019-08-18 04:53:15.959505: I tensorflow/stream_executor/platform/default/dso_loader.cc:42] Successfully opened dynamic library libcuda.so.1
2019-08-18 04:53:16.083690: I tensorflow/stream_executor/cuda/cuda_gpu_executor.cc:1005] successful NUMA node read from SysFS had negative value (-1), but there must be at least one NUMA node, so returning NUMA node zero
2019-08-18 04:53:16.084227: I tensorflow/compiler/xla/service/service.cc:168] XLA service 0x2455100 executing computations on platform CUDA. Devices:
2019-08-18 04:53:16.084262: I tensorflow/compiler/xla/service/service.cc:175]   StreamExecutor device (0): Tesla T4, Compute Capability 7.5
2019-08-18 04:53:16.086194: I tensorflow/core/platform/profile_utils/cpu_utils.cc:94] CPU Frequency: 2300000000 Hz
2019-08-18 04:53:16.086460: I tensorflow/compiler/xla/service/service.cc:168] XLA service 0x65e6380 executing computations on platform Host. Devices:
2019-08-18 04:53:16.086508: I tensorflow/compiler/xla/service/service.cc:175]   StreamExecutor device (0): <undefined>, <undefined>
2019-08-18 04:53:16.086686: I tensorflow/stream_executor/cuda/cuda_gpu_executor.cc:1005] successful NUMA node read from SysFS had negative value (-1), but there must be at least one NUMA node, so returning NUMA node zero
2019-08-18 04:53:16.087039: I tensorflow/core/common_runtime/gpu/gpu_device.cc:1640] Found device 0 with properties:
name: Tesla T4 major: 7 minor: 5 memoryClockRate(GHz): 1.59
pciBusID: 0000:00:04.0
2019-08-18 04:53:16.087321: I tensorflow/stream_executor/platform/default/dso_loader.cc:42] Successfully opened dynamic library libcudart.so.10.0
2019-08-18 04:53:16.088548: I tensorflow/stream_executor/platform/default/dso_loader.cc:42] Successfully opened dynamic library libcublas.so.10.0
2019-08-18 04:53:16.089621: I tensorflow/stream_executor/platform/default/dso_loader.cc:42] Successfully opened dynamic library libcufft.so.10.0
2019-08-18 04:53:16.089935: I tensorflow/stream_executor/platform/default/dso_loader.cc:42] Successfully opened dynamic library libcurand.so.10.0
2019-08-18 04:53:16.091399: I tensorflow/stream_executor/platform/default/dso_loader.cc:42] Successfully opened dynamic library libcusolver.so.10.0
2019-08-18 04:53:16.092394: I tensorflow/stream_executor/platform/default/dso_loader.cc:42] Successfully opened dynamic library libcusparse.so.10.0
2019-08-18 04:53:16.095470: I tensorflow/stream_executor/platform/default/dso_loader.cc:42] Successfully opened dynamic library libcudnn.so.7
2019-08-18 04:53:16.095606: I tensorflow/stream_executor/cuda/cuda_gpu_executor.cc:1005] successful NUMA node read from SysFS had negative value (-1), but there must be at least one NUMA node, so returning NUMA node zero
2019-08-18 04:53:16.096009: I tensorflow/stream_executor/cuda/cuda_gpu_executor.cc:1005] successful NUMA node read from SysFS had negative value (-1), but there must be at least one NUMA node, so returning NUMA node zero
2019-08-18 04:53:16.096350: I tensorflow/core/common_runtime/gpu/gpu_device.cc:1763] Adding visible gpu devices: 0
2019-08-18 04:53:16.096401: I tensorflow/stream_executor/platform/default/dso_loader.cc:42] Successfully opened dynamic library libcudart.so.10.0
2019-08-18 04:53:16.097166: I tensorflow/core/common_runtime/gpu/gpu_device.cc:1181] Device interconnect StreamExecutor with strength 1 edge matrix:
2019-08-18 04:53:16.097190: I tensorflow/core/common_runtime/gpu/gpu_device.cc:1187]      0
2019-08-18 04:53:16.097201: I tensorflow/core/common_runtime/gpu/gpu_device.cc:1200] 0:   N
2019-08-18 04:53:16.097482: I tensorflow/stream_executor/cuda/cuda_gpu_executor.cc:1005] successful NUMA node read from SysFS had negative value (-1), but there must be at least one NUMA node, so returning NUMA node zero
2019-08-18 04:53:16.097878: I tensorflow/stream_executor/cuda/cuda_gpu_executor.cc:1005] successful NUMA node read from SysFS had negative value (-1), but there must be at least one NUMA node, so returning NUMA node zero
2019-08-18 04:53:16.098226: I tensorflow/core/common_runtime/gpu/gpu_device.cc:1326] Created TensorFlow device (/job:localhost/replica:0/task:0/device:GPU:0 with 14089 MB memory) -> physical GPU (device: 0, name: Tesla T4, pci bus id: 0000:00:04.0, compute capability: 7.5)
"get_model_by_type" model Type is: linear
W0818 04:53:16.444941 140399927523200 deprecation.py:506] From /usr/local/lib/python3.6/dist-packages/tensorflow/python/ops/init_ops.py:1251: calling VarianceScaling.__init__ (from tensorflow.python.ops.init_ops) with dtype is deprecated and will be removed in a future version.
Instructions for updating:
Call initializer instance with the dtype argument instead of passing it to the constructor
training with model type <class 'donkeycar.parts.keras.KerasLinear'>
Model: "model"
__________________________________________________________________________________________________
Layer (type)                    Output Shape         Param #     Connected to
==================================================================================================
img_in (InputLayer)             [(None, 120, 160, 3) 0
__________________________________________________________________________________________________
conv2d_1 (Conv2D)               (None, 58, 78, 24)   1824        img_in[0][0]
__________________________________________________________________________________________________
dropout (Dropout)               (None, 58, 78, 24)   0           conv2d_1[0][0]
__________________________________________________________________________________________________
conv2d_2 (Conv2D)               (None, 27, 37, 32)   19232       dropout[0][0]
__________________________________________________________________________________________________
dropout_1 (Dropout)             (None, 27, 37, 32)   0           conv2d_2[0][0]
__________________________________________________________________________________________________
conv2d_3 (Conv2D)               (None, 12, 17, 64)   51264       dropout_1[0][0]
__________________________________________________________________________________________________
dropout_2 (Dropout)             (None, 12, 17, 64)   0           conv2d_3[0][0]
__________________________________________________________________________________________________
conv2d_4 (Conv2D)               (None, 10, 15, 64)   36928       dropout_2[0][0]
__________________________________________________________________________________________________
dropout_3 (Dropout)             (None, 10, 15, 64)   0           conv2d_4[0][0]
__________________________________________________________________________________________________
conv2d_5 (Conv2D)               (None, 8, 13, 64)    36928       dropout_3[0][0]
__________________________________________________________________________________________________
dropout_4 (Dropout)             (None, 8, 13, 64)    0           conv2d_5[0][0]
__________________________________________________________________________________________________
flattened (Flatten)             (None, 6656)         0           dropout_4[0][0]
__________________________________________________________________________________________________
dense (Dense)                   (None, 100)          665700      flattened[0][0]
__________________________________________________________________________________________________
dropout_5 (Dropout)             (None, 100)          0           dense[0][0]
__________________________________________________________________________________________________
dense_1 (Dense)                 (None, 50)           5050        dropout_5[0][0]
__________________________________________________________________________________________________
dropout_6 (Dropout)             (None, 50)           0           dense_1[0][0]
__________________________________________________________________________________________________
n_outputs0 (Dense)              (None, 1)            51          dropout_6[0][0]
__________________________________________________________________________________________________
n_outputs1 (Dense)              (None, 1)            51          dropout_6[0][0]
==================================================================================================
Total params: 817,028
Trainable params: 817,028
Non-trainable params: 0
__________________________________________________________________________________________________
None
found 0 pickles writing json records and images in tub /content/mycar/data/tub_3_19-08-17
/content/mycar/data/tub_3_19-08-17
collating 5799 records ...
train: 4639, val: 1160
total records: 5799
steps_per_epoch 36
Epoch 1/100
2019-08-18 04:53:19.663907: I tensorflow/stream_executor/platform/default/dso_loader.cc:42] Successfully opened dynamic library libcublas.so.10.0
2019-08-18 04:53:19.984999: I tensorflow/stream_executor/platform/default/dso_loader.cc:42] Successfully opened dynamic library libcudnn.so.7
35/36 [============================>.] - ETA: 0s - loss: 0.1681 - n_outputs0_loss: 0.1555 - n_outputs1_loss: 0.0126
Epoch 00001: val_loss improved from inf to 0.14482, saving model to /content/mycar/models/mypilot.h5
36/36 [==============================] - 8s 213ms/step - loss: 0.1677 - n_outputs0_loss: 0.1553 - n_outputs1_loss: 0.0124 - val_loss: 0.1448 - val_n_outputs0_loss: 0.1409 - val_n_outputs1_loss: 0.0039
Epoch 2/100
34/36 [===========================>..] - ETA: 0s - loss: 0.1278 - n_outputs0_loss: 0.1234 - n_outputs1_loss: 0.0044
Epoch 00002: val_loss improved from 0.14482 to 0.08814, saving model to /content/mycar/models/mypilot.h5
36/36 [==============================] - 2s 53ms/step - loss: 0.1257 - n_outputs0_loss: 0.1214 - n_outputs1_loss: 0.0043 - val_loss: 0.0881 - val_n_outputs0_loss: 0.0870 - val_n_outputs1_loss: 0.0012
Epoch 3/100
35/36 [============================>.] - ETA: 0s - loss: 0.0943 - n_outputs0_loss: 0.0910 - n_outputs1_loss: 0.0033
Epoch 00003: val_loss improved from 0.08814 to 0.07490, saving model to /content/mycar/models/mypilot.h5
36/36 [==============================] - 2s 52ms/step - loss: 0.0938 - n_outputs0_loss: 0.0905 - n_outputs1_loss: 0.0033 - val_loss: 0.0749 - val_n_outputs0_loss: 0.0738 - val_n_outputs1_loss: 0.0011
Epoch 4/100
35/36 [============================>.] - ETA: 0s - loss: 0.0840 - n_outputs0_loss: 0.0813 - n_outputs1_loss: 0.0027
Epoch 00004: val_loss improved from 0.07490 to 0.07108, saving model to /content/mycar/models/mypilot.h5
36/36 [==============================] - 2s 51ms/step - loss: 0.0835 - n_outputs0_loss: 0.0808 - n_outputs1_loss: 0.0027 - val_loss: 0.0711 - val_n_outputs0_loss: 0.0702 - val_n_outputs1_loss: 8.9668e-04
Epoch 5/100
35/36 [============================>.] - ETA: 0s - loss: 0.0767 - n_outputs0_loss: 0.0741 - n_outputs1_loss: 0.0026
Epoch 00005: val_loss did not improve from 0.07108
36/36 [==============================] - 2s 50ms/step - loss: 0.0765 - n_outputs0_loss: 0.0739 - n_outputs1_loss: 0.0026 - val_loss: 0.0722 - val_n_outputs0_loss: 0.0717 - val_n_outputs1_loss: 5.4629e-04
Epoch 6/100
35/36 [============================>.] - ETA: 0s - loss: 0.0750 - n_outputs0_loss: 0.0727 - n_outputs1_loss: 0.0023
Epoch 00006: val_loss improved from 0.07108 to 0.06483, saving model to /content/mycar/models/mypilot.h5
36/36 [==============================] - 2s 52ms/step - loss: 0.0749 - n_outputs0_loss: 0.0725 - n_outputs1_loss: 0.0024 - val_loss: 0.0648 - val_n_outputs0_loss: 0.0641 - val_n_outputs1_loss: 7.5336e-04
Epoch 7/100
35/36 [============================>.] - ETA: 0s - loss: 0.0711 - n_outputs0_loss: 0.0689 - n_outputs1_loss: 0.0022
Epoch 00007: val_loss improved from 0.06483 to 0.06324, saving model to /content/mycar/models/mypilot.h5
36/36 [==============================] - 2s 52ms/step - loss: 0.0711 - n_outputs0_loss: 0.0689 - n_outputs1_loss: 0.0021 - val_loss: 0.0632 - val_n_outputs0_loss: 0.0626 - val_n_outputs1_loss: 5.9058e-04
Epoch 8/100
35/36 [============================>.] - ETA: 0s - loss: 0.0693 - n_outputs0_loss: 0.0675 - n_outputs1_loss: 0.0018
Epoch 00008: val_loss did not improve from 0.06324
36/36 [==============================] - 2s 51ms/step - loss: 0.0690 - n_outputs0_loss: 0.0672 - n_outputs1_loss: 0.0018 - val_loss: 0.0644 - val_n_outputs0_loss: 0.0637 - val_n_outputs1_loss: 7.8261e-04
Epoch 9/100
35/36 [============================>.] - ETA: 0s - loss: 0.0693 - n_outputs0_loss: 0.0675 - n_outputs1_loss: 0.0018
Epoch 00009: val_loss did not improve from 0.06324
36/36 [==============================] - 2s 50ms/step - loss: 0.0690 - n_outputs0_loss: 0.0672 - n_outputs1_loss: 0.0018 - val_loss: 0.0653 - val_n_outputs0_loss: 0.0646 - val_n_outputs1_loss: 6.6657e-04
Epoch 10/100
34/36 [===========================>..] - ETA: 0s - loss: 0.0651 - n_outputs0_loss: 0.0633 - n_outputs1_loss: 0.0018
Epoch 00010: val_loss did not improve from 0.06324
36/36 [==============================] - 2s 51ms/step - loss: 0.0657 - n_outputs0_loss: 0.0639 - n_outputs1_loss: 0.0018 - val_loss: 0.0699 - val_n_outputs0_loss: 0.0692 - val_n_outputs1_loss: 6.9729e-04
Epoch 11/100
35/36 [============================>.] - ETA: 0s - loss: 0.0630 - n_outputs0_loss: 0.0612 - n_outputs1_loss: 0.0018
Epoch 00011: val_loss did not improve from 0.06324
36/36 [==============================] - 2s 51ms/step - loss: 0.0630 - n_outputs0_loss: 0.0612 - n_outputs1_loss: 0.0018 - val_loss: 0.0633 - val_n_outputs0_loss: 0.0619 - val_n_outputs1_loss: 0.0014
Epoch 12/100
35/36 [============================>.] - ETA: 0s - loss: 0.0643 - n_outputs0_loss: 0.0626 - n_outputs1_loss: 0.0016
Epoch 00012: val_loss improved from 0.06324 to 0.06034, saving model to /content/mycar/models/mypilot.h5
36/36 [==============================] - 2s 52ms/step - loss: 0.0644 - n_outputs0_loss: 0.0628 - n_outputs1_loss: 0.0017 - val_loss: 0.0603 - val_n_outputs0_loss: 0.0598 - val_n_outputs1_loss: 4.9525e-04
Epoch 13/100
35/36 [============================>.] - ETA: 0s - loss: 0.0611 - n_outputs0_loss: 0.0597 - n_outputs1_loss: 0.0014
Epoch 00013: val_loss improved from 0.06034 to 0.05636, saving model to /content/mycar/models/mypilot.h5
36/36 [==============================] - 2s 52ms/step - loss: 0.0613 - n_outputs0_loss: 0.0599 - n_outputs1_loss: 0.0014 - val_loss: 0.0564 - val_n_outputs0_loss: 0.0557 - val_n_outputs1_loss: 6.3083e-04
Epoch 14/100
34/36 [===========================>..] - ETA: 0s - loss: 0.0593 - n_outputs0_loss: 0.0580 - n_outputs1_loss: 0.0013
Epoch 00014: val_loss did not improve from 0.05636
36/36 [==============================] - 2s 51ms/step - loss: 0.0590 - n_outputs0_loss: 0.0577 - n_outputs1_loss: 0.0013 - val_loss: 0.0580 - val_n_outputs0_loss: 0.0575 - val_n_outputs1_loss: 5.4033e-04
Epoch 15/100
34/36 [===========================>..] - ETA: 0s - loss: 0.0552 - n_outputs0_loss: 0.0540 - n_outputs1_loss: 0.0012
Epoch 00015: val_loss did not improve from 0.05636
36/36 [==============================] - 2s 51ms/step - loss: 0.0555 - n_outputs0_loss: 0.0542 - n_outputs1_loss: 0.0012 - val_loss: 0.0565 - val_n_outputs0_loss: 0.0559 - val_n_outputs1_loss: 5.6679e-04
Epoch 16/100
35/36 [============================>.] - ETA: 0s - loss: 0.0538 - n_outputs0_loss: 0.0527 - n_outputs1_loss: 0.0012
Epoch 00016: val_loss did not improve from 0.05636
36/36 [==============================] - 2s 50ms/step - loss: 0.0538 - n_outputs0_loss: 0.0526 - n_outputs1_loss: 0.0012 - val_loss: 0.0624 - val_n_outputs0_loss: 0.0619 - val_n_outputs1_loss: 5.0014e-04
Epoch 17/100
35/36 [============================>.] - ETA: 0s - loss: 0.0536 - n_outputs0_loss: 0.0525 - n_outputs1_loss: 0.0011
Epoch 00017: val_loss improved from 0.05636 to 0.05615, saving model to /content/mycar/models/mypilot.h5
36/36 [==============================] - 2s 53ms/step - loss: 0.0534 - n_outputs0_loss: 0.0523 - n_outputs1_loss: 0.0011 - val_loss: 0.0561 - val_n_outputs0_loss: 0.0556 - val_n_outputs1_loss: 5.2067e-04
Epoch 18/100
35/36 [============================>.] - ETA: 0s - loss: 0.0502 - n_outputs0_loss: 0.0492 - n_outputs1_loss: 0.0011
Epoch 00018: val_loss improved from 0.05615 to 0.05594, saving model to /content/mycar/models/mypilot.h5
36/36 [==============================] - 2s 52ms/step - loss: 0.0501 - n_outputs0_loss: 0.0490 - n_outputs1_loss: 0.0011 - val_loss: 0.0559 - val_n_outputs0_loss: 0.0555 - val_n_outputs1_loss: 4.4089e-04
Epoch 00018: early stopping
Training completed in 0:00:40.


----------- Best Eval Loss :0.055939 ---------
<Figure size 640x480 with 1 Axes>
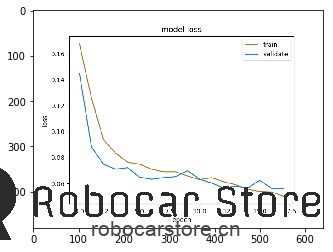
显示训练结果的Loss曲线
In [26]:
import matplotlib.pyplot as plt
list_of_png = glob.glob('/content/mycar/models/*png')
latest_png = max(list_of_png, key=os.path.getctime)
image = cv2.imread(latest_png)
/content/mycar/models/mypilot.h5_loss_acc_0.055939.png
Out[26]:
<matplotlib.image.AxesImage at 0x7f867c896be0>
将训练好的模型放回 Donkey Car.
一旦模型训练完毕,你可以在 mycar/models中找到训练好的模型
1.下载mypilot文件到你到PC或Mac
- 再从PC或Mac拷贝模型到你到pi
最后用Autopilot mode来驾驶Donkey car
Enjoy!