Skip to content

博客列表

Donkey Car Detailed Explanation (2) – Raspberry Pi Installation

Donkey Car Detailed Explanation (2) – Raspberry Pi Installation

robocarstore/173807615525023113

Now the official Donkey Car is no longer provided with a lazy person's version, so this time we will share the process of installing Donkey Car on a Raspberry Pi (Raspberry Pi 3 B+).

Reference: http://docs.donkeycar.com/guide/robot_sbc/setup_raspberry_pi/


Environment

The official recommendation is to use Raspian Lite(Stretch) (352MB). However, I used the desktop version, as follows:

Raspberry Pi OS:
– Raspbian Buster with desktop
Version:July 2019
Release date:2019-07-10
Kernel version:4.19

Download Url:

https://www.raspberrypi.org/downloads/raspbian/

How to flash install Raspberry Pi, here is no more.

Assume you have already installed the Raspberry Pi system and can connect to the network, you can choose to connect to the display directly (this example's operation mode), or remotely SSH. You like it.

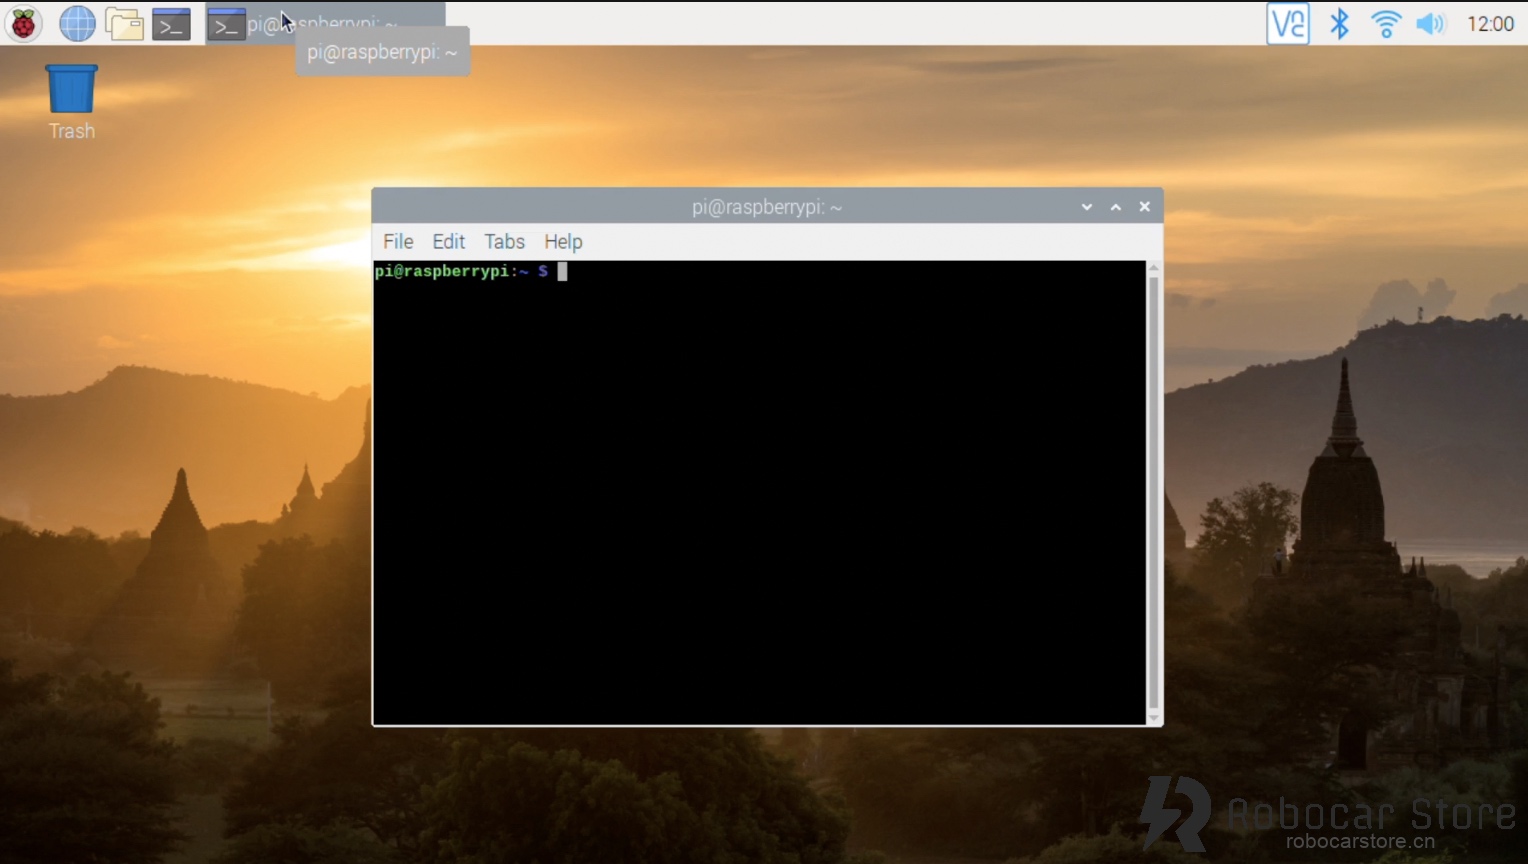
Open the command line, let's start!

donkeycar-rpi


Start Installation

1,Update your system before installation

To update your system, enter the following command:

Updating the system takes a long time and may need to be repeated multiple times to complete. Please be patient.

2,Configure Raspberry Pi to enable camera, I2C, expand file system

To open the Raspberry Pi configuration dialog, enter the following command in the command line:

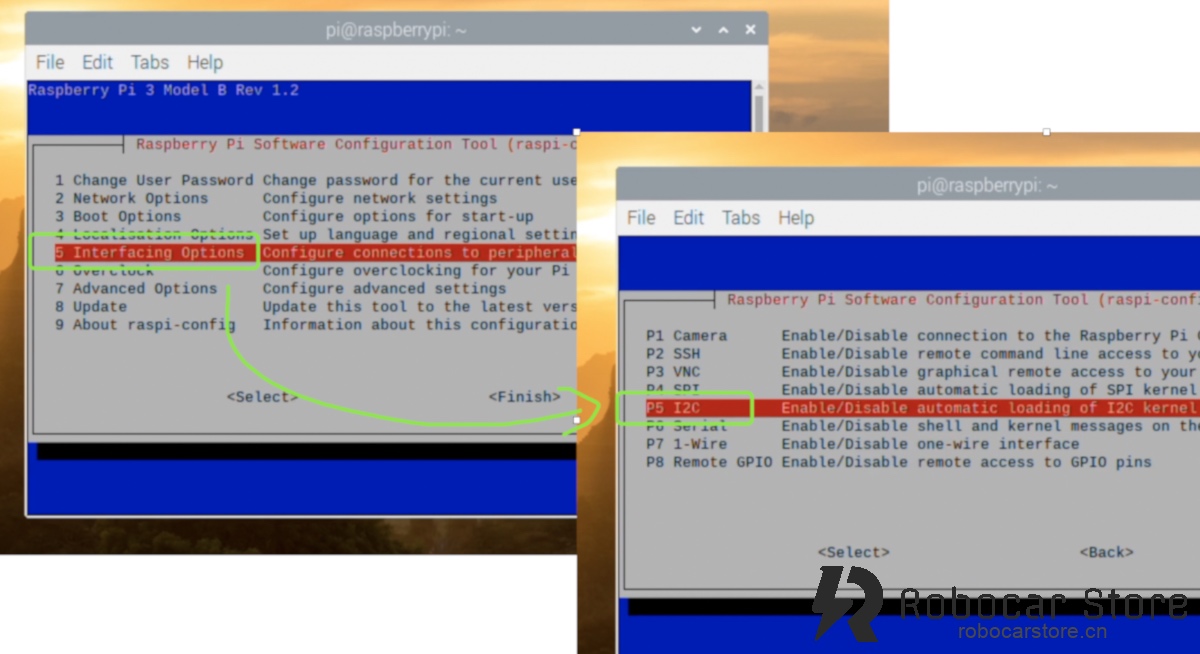
① Enable I2C

05 Interfacing Options -> P5 I2C ->「Yes」

rpi_i2c

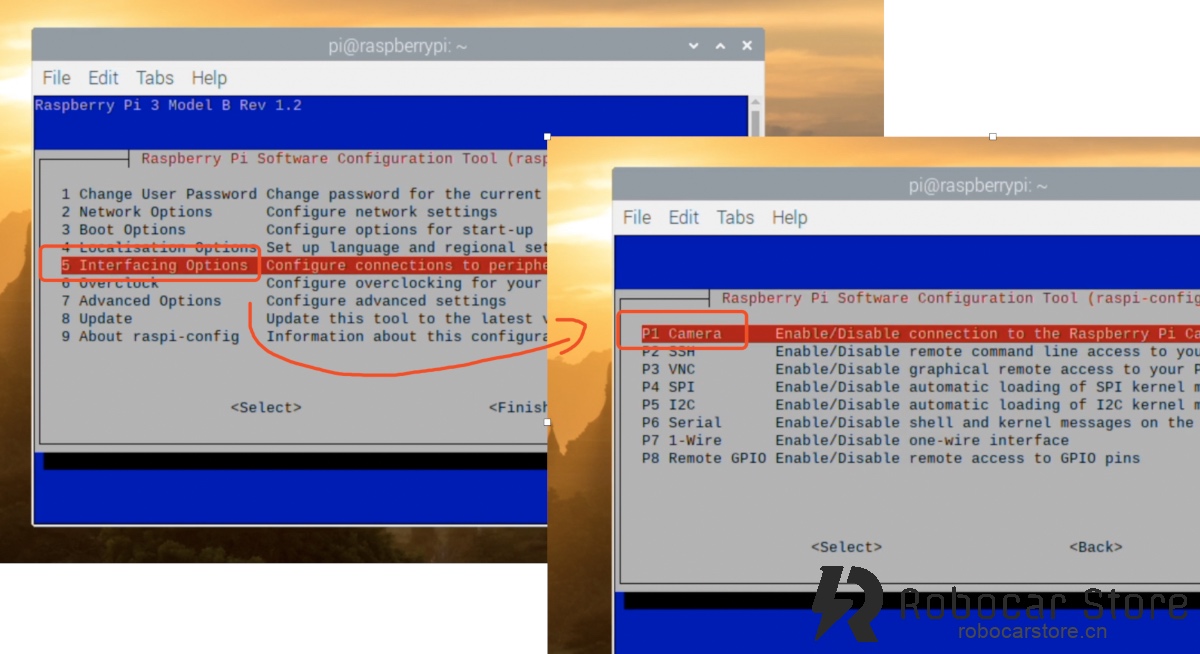
② Enable Camera:

05 Interfacing Options -> P1 Camera -> 「Yes」

robocarstore/173807630025267416

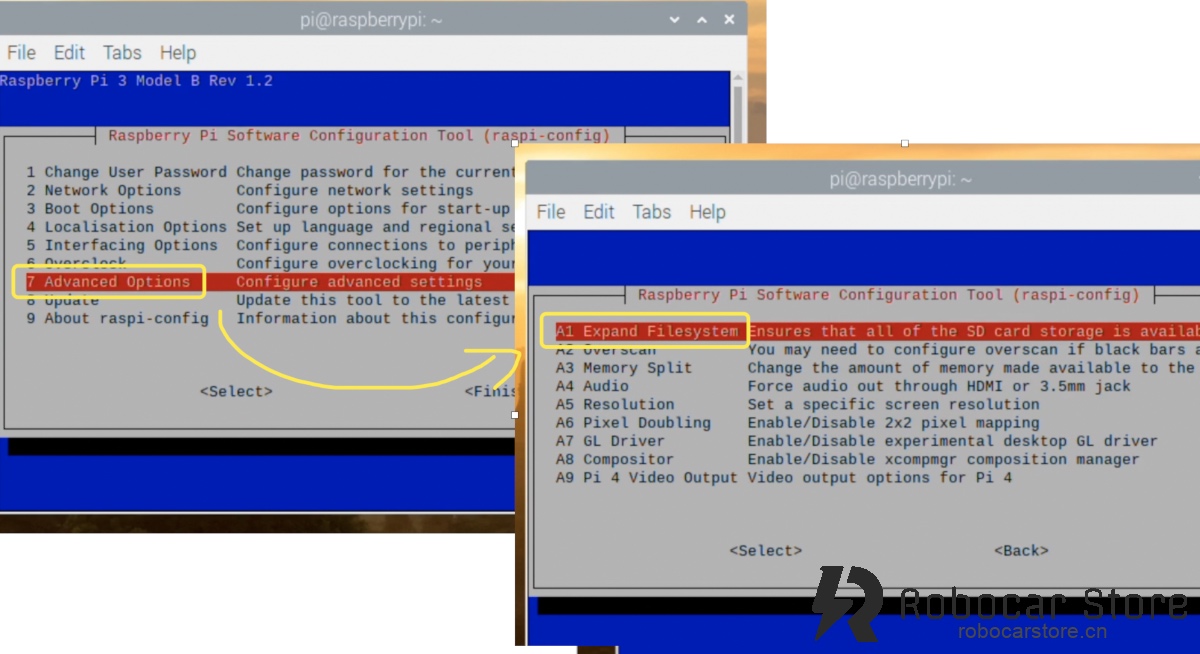
③ Expand File System

7 Advanced Options -> A1 Exapand Filesystem

robocarstore/173807631425048117

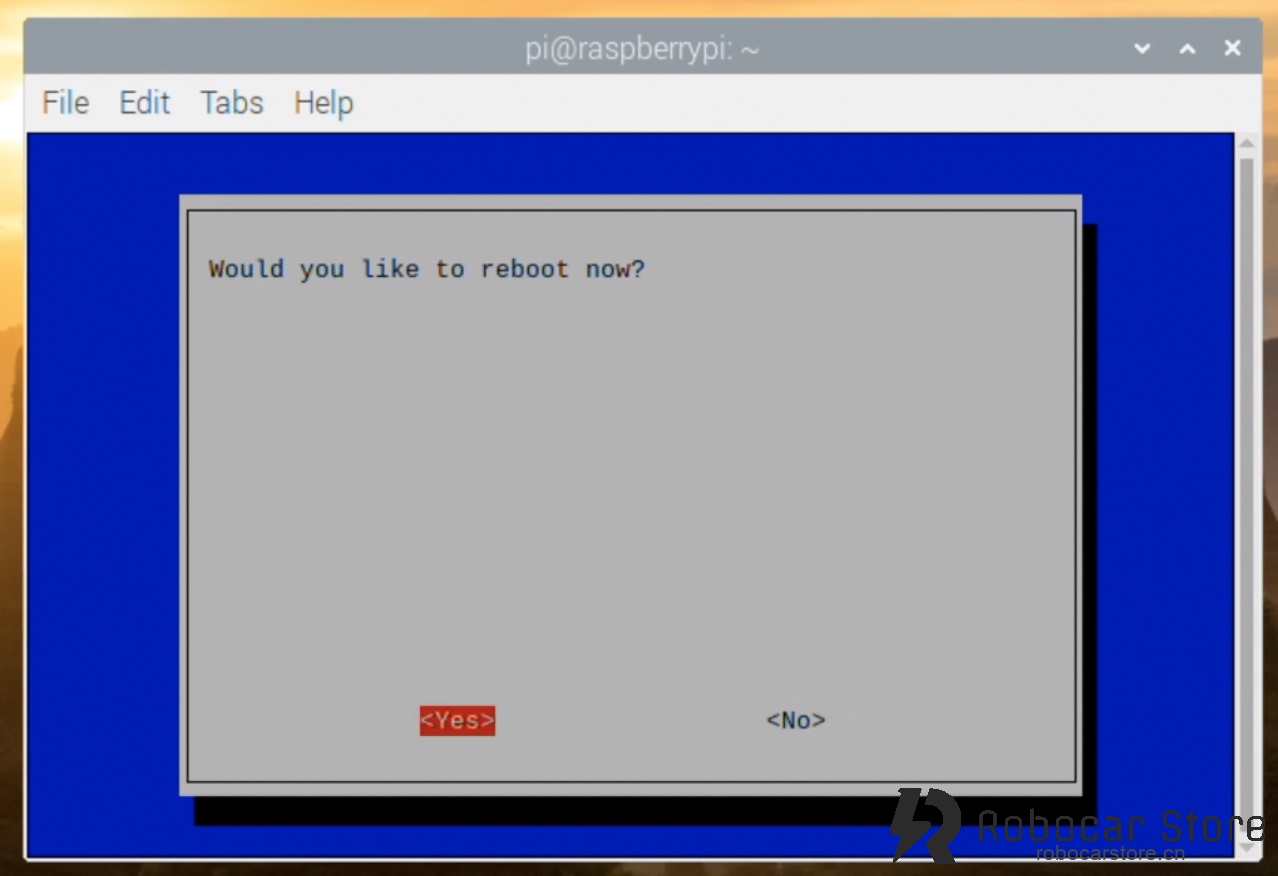
Set it up, then exit the configuration dialog, it will prompt whether to restart now, select 「Yes」 to restart the system.

robocarstore/173807632825076218

3,Install the dependencies required for Donkey Car

Enter the following command in the command line:

sudo apt-get install -y build-essential python3 python3-dev python3-pip python3-virtualenv python3-numpy python3-picamera python3-pandas python3-rpi.gpio i2c-tools avahi-utils joystick libopenjp2-7-dev libtiff5-dev gfortran libatlas-base-dev libopenblas-dev libhdf5-serial-dev git

After a long wait, it will be installed, if an error occurs, please run it again.

(If the problem is still not resolved, please share the problem you encountered in the comments section, and post your system version, as much information as possible, so we can help you.)

4,Install OpenCV dependencies (optional)

This step is optional, you can skip it if you don't use the OpenCV feature.

If you still want to install it, enter the following command in the command line:

sudo apt-get install libilmbase-dev libopenexr-dev libgstreamer1.0-dev libjasper-dev libwebp-dev libatlas-base-dev libavcodec-dev libavformat-dev libswscale-dev libqtgui4 libqt4-test

5,Install Virtual Environment

Enter the following command in the command line:

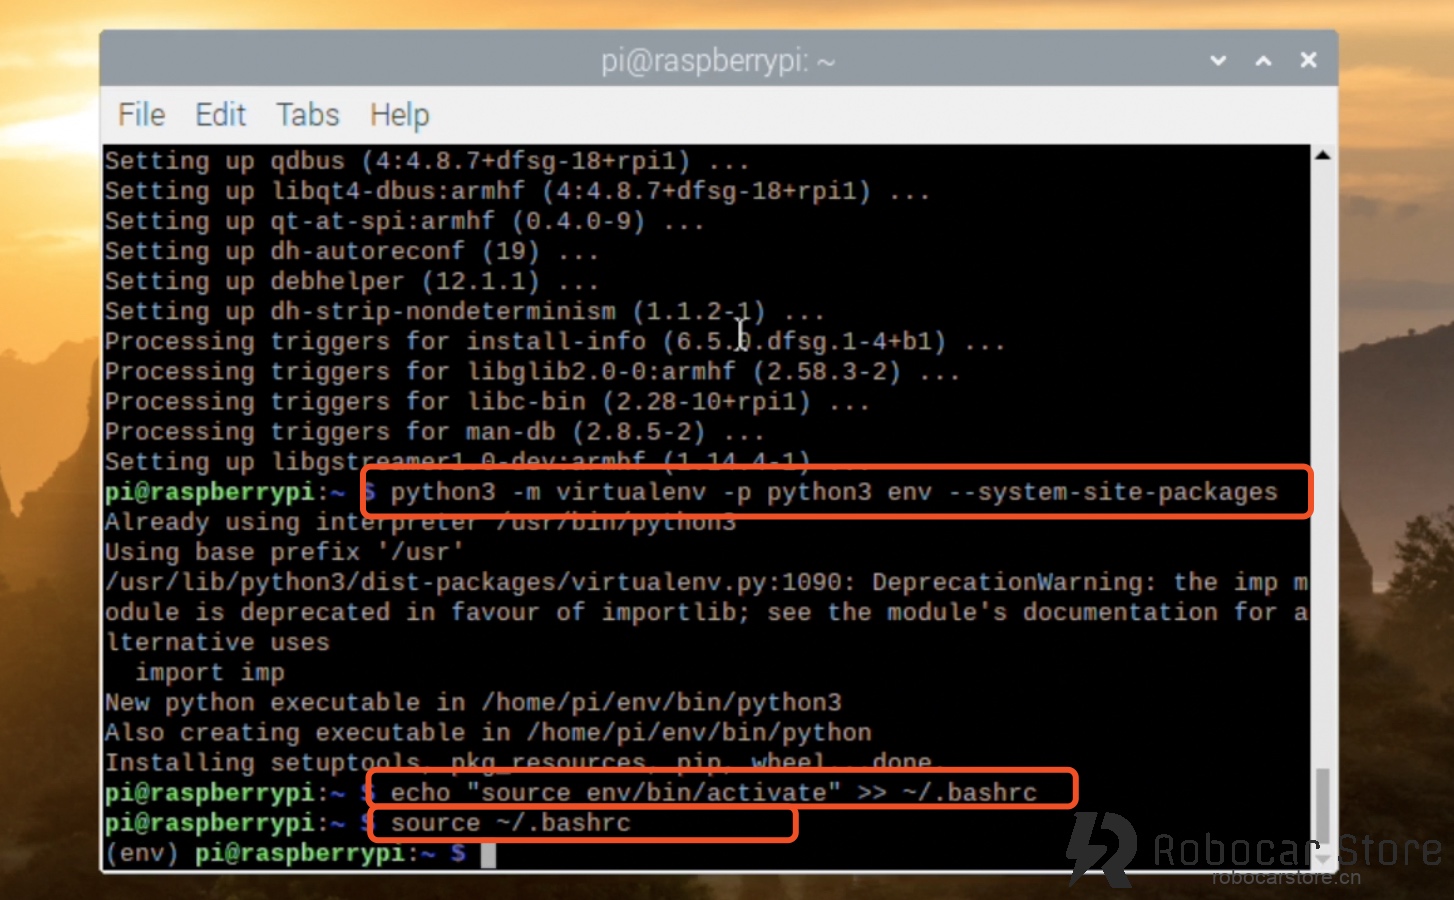
python3 -m virtualenv -p python3 env --system-site-packages

echo "source env/bin/activate" >> ~/.bashrc

After running the above commands, the command line will have a (env) prefix, indicating that we are operating in an environment called env.

robocarstore/173807634625230519

The purpose of the virtual environment is to avoid errors in other projects when updating a dependency or automatically clearing a dependency on the Raspberry Pi running multiple projects.

Now, every time the Raspberry Pi starts, it will automatically enter the env virtual environment. If you want to exit, enter the command line: deactivate .

6,Install Donkey Car's Python Code

Create Directory, and Enter the Directory

In the user directory, create a folder named projects (directory), and enter the folder, enter the following command:

Note: Directly enter the user directory, just enter the command line: cd , press Enter.

Clone the entire Donkey car project from GitHub

Enter the following command:

git clone https://github.com/autorope/donkeycar

Then, start a long wait, because the speed of github in China is not fast, please be patient, if it doesn't work, run it again.

Note: If you are familiar with command line instructions, you can use the scp command to download some software projects after packaging, and upload them to the current directory of the Raspberry Pi. For specific usage, please search for it yourself.

When git clone (clone) is complete, we use the following command to operate:

pip install tensorflow==1.13.1

Note:
– When running pip install -e .[pi] installation, if an error occurs, you can try to run it again.
– When running pip install tensorflow==1.13.1 , it may prompt that the downloaded file's hash code is incorrect, causing it to be unable to download. You can manually use the wget command to download it according to the error prompt, download it, and then use pip install 「downloaded file name」 to install it.

Verify Tensorflow Installation Success

Enter the following command to enter the Python interactive programming mode:

Enter the following code to check:

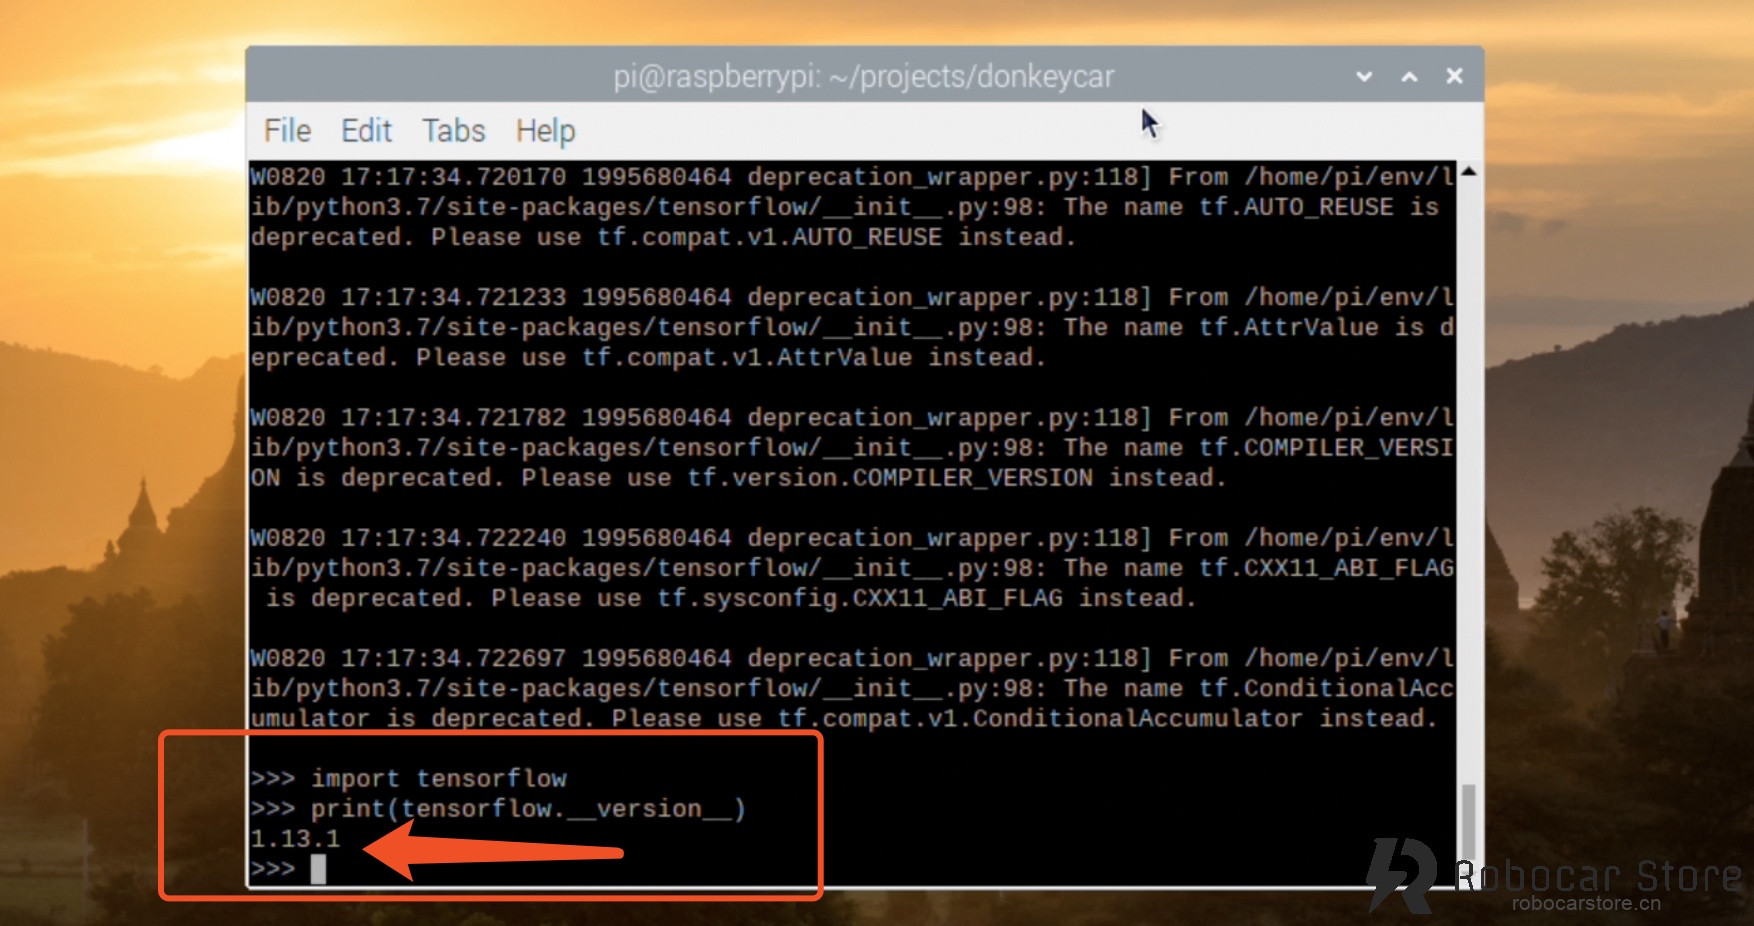
print(tensorflow.__version__)

robocarstore/173807637225182120

When you see the version 1.13.1, it proves that you have successfully installed Tensorflow.

Note: Python will have some prompts when loading tensorflow for the first time, please don't worry, this is not an error prompt.

7,Install Python's OpenCV (optional)

Install OpenCV

This is also not required to be installed, if you don't use the OpenCV feature.

But if you still want to install it, please enter the following command:

pip install opencv-python

Verify Whether OpenCV Installation Success

Enter the following code to enter the Python interactive programming mode:

python import cv2 print(cv2.__version__)

Donkey Car Detailed Explanation (2) – Raspberry Pi Installation

Donkey Car Detailed Explanation (2) – Raspberry Pi Installation

robocarstore/173807615525023113

Now the official Donkey Car is no longer provided with a lazy person's version, so this time we will share the process of installing Donkey Car on a Raspberry Pi (Raspberry Pi 3 B+).

Reference: http://docs.donkeycar.com/guide/robot_sbc/setup_raspberry_pi/


Environment

The official recommendation is to use Raspian Lite(Stretch) (352MB). However, I used the desktop version, as follows:

Raspberry Pi OS:
– Raspbian Buster with desktop
Version:July 2019
Release date:2019-07-10
Kernel version:4.19

Download Url:

https://www.raspberrypi.org/downloads/raspbian/

How to flash install Raspberry Pi, here is no more.

Assume you have already installed the Raspberry Pi system and can connect to the network, you can choose to connect to the display directly (this example's operation mode), or remotely SSH. You like it.

Open the command line, let's start!

donkeycar-rpi


Start Installation

1,Update your system before installation

To update your system, enter the following command:

Updating the system takes a long time and may need to be repeated multiple times to complete. Please be patient.

2,Configure Raspberry Pi to enable camera, I2C, expand file system

To open the Raspberry Pi configuration dialog, enter the following command in the command line:

① Enable I2C

05 Interfacing Options -> P5 I2C ->「Yes」

rpi_i2c

② Enable Camera:

05 Interfacing Options -> P1 Camera -> 「Yes」

robocarstore/173807630025267416

③ Expand File System

7 Advanced Options -> A1 Exapand Filesystem

robocarstore/173807631425048117

Set it up, then exit the configuration dialog, it will prompt whether to restart now, select 「Yes」 to restart the system.

robocarstore/173807632825076218

3,Install the dependencies required for Donkey Car

Enter the following command in the command line:

sudo apt-get install -y build-essential python3 python3-dev python3-pip python3-virtualenv python3-numpy python3-picamera python3-pandas python3-rpi.gpio i2c-tools avahi-utils joystick libopenjp2-7-dev libtiff5-dev gfortran libatlas-base-dev libopenblas-dev libhdf5-serial-dev git

After a long wait, it will be installed, if an error occurs, please run it again.

(If the problem is still not resolved, please share the problem you encountered in the comments section, and post your system version, as much information as possible, so we can help you.)

4,Install OpenCV dependencies (optional)

This step is optional, you can skip it if you don't use the OpenCV feature.

If you still want to install it, enter the following command in the command line:

sudo apt-get install libilmbase-dev libopenexr-dev libgstreamer1.0-dev libjasper-dev libwebp-dev libatlas-base-dev libavcodec-dev libavformat-dev libswscale-dev libqtgui4 libqt4-test

5,Install Virtual Environment

Enter the following command in the command line:

python3 -m virtualenv -p python3 env --system-site-packages

echo "source env/bin/activate" >> ~/.bashrc

After running the above commands, the command line will have a (env) prefix, indicating that we are operating in an environment called env.

robocarstore/173807634625230519

The purpose of the virtual environment is to avoid errors in other projects when updating a dependency or automatically clearing a dependency on the Raspberry Pi running multiple projects.

Now, every time the Raspberry Pi starts, it will automatically enter the env virtual environment. If you want to exit, enter the command line: deactivate .

6,Install Donkey Car's Python Code

Create Directory, and Enter the Directory

In the user directory, create a folder named projects (directory), and enter the folder, enter the following command:

Note: Directly enter the user directory, just enter the command line: cd , press Enter.

Clone the entire Donkey car project from GitHub

Enter the following command:

git clone https://github.com/autorope/donkeycar

Then, start a long wait, because the speed of github in China is not fast, please be patient, if it doesn't work, run it again.

Note: If you are familiar with command line instructions, you can use the scp command to download some software projects after packaging, and upload them to the current directory of the Raspberry Pi. For specific usage, please search for it yourself.

When git clone (clone) is complete, we use the following command to operate:

pip install tensorflow==1.13.1

Note:
– When running pip install -e .[pi] installation, if an error occurs, you can try to run it again.
– When running pip install tensorflow==1.13.1 , it may prompt that the downloaded file's hash code is incorrect, causing it to be unable to download. You can manually use the wget command to download it according to the error prompt, download it, and then use pip install 「downloaded file name」 to install it.

Verify Tensorflow Installation Success

Enter the following command to enter the Python interactive programming mode:

Enter the following code to check:

print(tensorflow.__version__)

robocarstore/173807637225182120

When you see the version 1.13.1, it proves that you have successfully installed Tensorflow.

Note: Python will have some prompts when loading tensorflow for the first time, please don't worry, this is not an error prompt.

7,Install Python's OpenCV (optional)

Install OpenCV

This is also not required to be installed, if you don't use the OpenCV feature.

But if you still want to install it, please enter the following command:

pip install opencv-python

Verify Whether OpenCV Installation Success

Enter the following code to enter the Python interactive programming mode:

python import cv2 print(cv2.__version__)

Use Colab to Accelerate Donkey Car Training (Tensorflow GPU)

colab

This notebook helps you quickly train your Donkey car or autonomous car model.

Reference and improved the notebook of @sachindroid8, thanks to the previous generation!

The Pros and Cons of Using Colab for Training

  1. Efficiency

Using Colab requires a VPN, and also needs to upload data to Google, the upload time varies from person to person, I uploaded it for about 2-3 minutes, the rest is executing the code and training. The first execution of the code needs to understand what the principle is, and the subsequent execution basically does not take much time, but the training time using GPU, I have 6k images, training about 30-40 epochs early, the training time is less than 1 minute! Each Epoch only needs 1-2 seconds.

Then using my Macbook Pro training, because of the lack of GPU, each Epoch needs 30-50 seconds, training down, it takes about 40 minutes to 1 hour to complete.

  1. Convenience

If you don't have a VPN, of course, Colab is not a choice, I know Baidu also provides some limited free servers, which can be tested later, but with a VPN, Google Colab is the best choice. Below is how to start training

Load My Notebook

Open the Using Google_Colab to Donkey_Car

Install TensorFlow 1.14.0

TensorFlow 2.x and Donkey Car 3.x still have compatibility issues, so it is not recommended to use them temporarily (2019.8.17)In [1]:

!pip install tensorflow-gpu==1.14.0

Collecting tensorflow-gpu==1.14.0
  Downloading https://files.pythonhosted.org/packages/76/04/43153bfdfcf6c9a4c38ecdb971ca9a75b9a791bb69a764d652c359aca504/tensorflow_gpu-1.14.0-cp36-cp36m-manylinux1_x86_64.whl (377.0MB)
     |████████████████████████████████| 377.0MB 86kB/s 
Requirement already satisfied: grpcio>=1.8.6 in /usr/local/lib/python3.6/dist-packages (from tensorflow-gpu==1.14.0) (1.15.0)
Requirement already satisfied: absl-py>=0.7.0 in /usr/local/lib/python3.6/dist-packages (from tensorflow-gpu==1.14.0) (0.7.1)
Requirement already satisfied: tensorflow-estimator<1.15.0rc0,>=1.14.0rc0 in /usr/local/lib/python3.6/dist-packages (from tensorflow-gpu==1.14.0) (1.14.0)
Requirement already satisfied: wrapt>=1.11.1 in /usr/local/lib/python3.6/dist-packages (from tensorflow-gpu==1.14.0) (1.11.2)
Requirement already satisfied: termcolor>=1.1.0 in /usr/local/lib/python3.6/dist-packages (from tensorflow-gpu==1.14.0) (1.1.0)
Requirement already satisfied: astor>=0.6.0 in /usr/local/lib/python3.6/dist-packages (from tensorflow-gpu==1.14.0) (0.8.0)
Requirement already satisfied: keras-applications>=1.0.6 in /usr/local/lib/python3.6/dist-packages (from tensorflow-gpu==1.14.0) (1.0.8)
Requirement already satisfied: tensorboard<1.15.0,>=1.14.0 in /usr/local/lib/python3.6/dist-packages (from tensorflow-gpu==1.14.0) (1.14.0)
Requirement already satisfied: wheel>=0.26 in /usr/local/lib/python3.6/dist-packages (from tensorflow-gpu==1.14.0) (0.33.4)
Requirement already satisfied: protobuf>=3.6.1 in /usr/local/lib/python3.6/dist-packages (from tensorflow-gpu==1.14.0) (3.7.1)
Requirement already satisfied: six>=1.10.0 in /usr/local/lib/python3.6/dist-packages (from tensorflow-gpu==1.14.0) (1.12.0)
Requirement already satisfied: keras-preprocessing>=1.0.5 in /usr/local/lib/python3.6/dist-packages (from tensorflow-gpu==1.14.0) (1.1.0)
Requirement already satisfied: google-pasta>=0.1.6 in /usr/local/lib/python3.6/dist-packages (from tensorflow-gpu==1.14.0) (0.1.7)
Requirement already satisfied: gast>=0.2.0 in /usr/local/lib/python3.6/dist-packages (from tensorflow-gpu==1.14.0) (0.2.2)
Requirement already satisfied: numpy<2.0,>=1.14.5 in /usr/local/lib/python3.6/dist-packages (from tensorflow-gpu==1.14.0) (1.16.4)
Requirement already satisfied: h5py in /usr/local/lib/python3.6/dist-packages (from keras-applications>=1.0.6->tensorflow-gpu==1.14.0) (2.8.0)
Requirement already satisfied: markdown>=2.6.8 in /usr/local/lib/python3.6/dist-packages (from tensorboard<1.15.0,>=1.14.0->tensorflow-gpu==1.14.0) (3.1.1)
Requirement already satisfied: werkzeug>=0.11.15 in /usr/local/lib/python3.6/dist-packages (from tensorboard<1.15.0,>=1.14.0->tensorflow-gpu==1.14.0) (0.15.5)
Requirement already satisfied: setuptools>=41.0.0 in /usr/local/lib/python3.6/dist-packages (from tensorboard<1.15.0,>=1.14.0->tensorflow-gpu==1.14.0) (41.0.1)
Installing collected packages: tensorflow-gpu
Successfully installed tensorflow-gpu-1.14.0

Check if GPU is working

If you see “Found GPU at: / device: GPU: 0”, then the GPU is working normally

If you don't see the above output, you need to check if the Runtime (Run Type) has selected the GPU hardware acceleratorIn [2]:

device_name = tf.test.gpu_device_name()

if device_name != '/device:GPU:0':

raise SystemError('GPU device not found')

print('Found GPU at: {}'.format(device_name))

Found GPU at: /device:GPU:0

克隆Donkey respository

In [3]:

!git clone https://github.com/autorope/donkeycar.git donkey

Cloning into 'donkey'...
remote: Enumerating objects: 120, done.
remote: Counting objects: 100% (120/120), done.
remote: Compressing objects: 100% (76/76), done.
remote: Total 10558 (delta 65), reused 73 (delta 31), pack-reused 10438
Receiving objects: 100% (10558/10558), 58.74 MiB | 46.70 MiB/s, done.
Resolving deltas: 100% (6528/6528), done.

Install Donkey car

In [4]:

Obtaining file:///content/donkey
Requirement already satisfied: numpy in /usr/local/lib/python3.6/dist-packages (from donkeycar==3.1.0) (1.16.4)
Requirement already satisfied: pillow in /usr/local/lib/python3.6/dist-packages (from donkeycar==3.1.0) (4.3.0)
Requirement already satisfied: docopt in /usr/local/lib/python3.6/dist-packages (from donkeycar==3.1.0) (0.6.2)
Requirement already satisfied: tornado in /usr/local/lib/python3.6/dist-packages (from donkeycar==3.1.0) (4.5.3)
Requirement already satisfied: requests in /usr/local/lib/python3.6/dist-packages (from donkeycar==3.1.0) (2.21.0)
Requirement already satisfied: h5py in /usr/local/lib/python3.6/dist-packages (from donkeycar==3.1.0) (2.8.0)
Requirement already satisfied: moviepy in /usr/local/lib/python3.6/dist-packages (from donkeycar==3.1.0) (0.2.3.5)
Requirement already satisfied: pandas in /usr/local/lib/python3.6/dist-packages (from donkeycar==3.1.0) (0.24.2)
Requirement already satisfied: PrettyTable in /usr/local/lib/python3.6/dist-packages (from donkeycar==3.1.0) (0.7.2)
Collecting paho-mqtt (from donkeycar==3.1.0)
  Downloading https://files.pythonhosted.org/packages/25/63/db25e62979c2a716a74950c9ed658dce431b5cb01fde29eb6cba9489a904/paho-mqtt-1.4.0.tar.gz (88kB)
     |████████████████████████████████| 92kB 4.2MB/s 
Requirement already satisfied: olefile in /usr/local/lib/python3.6/dist-packages (from pillow->donkeycar==3.1.0) (0.46)
Requirement already satisfied: urllib3<1.25,>=1.21.1 in /usr/local/lib/python3.6/dist-packages (from requests->donkeycar==3.1.0) (1.24.3)
Requirement already satisfied: certifi>=2017.4.17 in /usr/local/lib/python3.6/dist-packages (from requests->donkeycar==3.1.0) (2019.6.16)
Requirement already satisfied: chardet<3.1.0,>=3.0.2 in /usr/local/lib/python3.6/dist-packages (from requests->donkeycar==3.1.0) (3.0.4)
Requirement already satisfied: idna<2.9,>=2.5 in /usr/local/lib/python3.6/dist-packages (from requests->donkeycar==3.1.0) (2.8)
Requirement already satisfied: six in /usr/local/lib/python3.6/dist-packages (from h5py->donkeycar==3.1.0) (1.12.0)
Requirement already satisfied: decorator<5.0,>=4.0.2 in /usr/local/lib/python3.6/dist-packages (from moviepy->donkeycar==3.1.0) (4.4.0)
Requirement already satisfied: tqdm<5.0,>=4.11.2 in /usr/local/lib/python3.6/dist-packages (from moviepy->donkeycar==3.1.0) (4.28.1)
Requirement already satisfied: imageio<3.0,>=2.1.2 in /usr/local/lib/python3.6/dist-packages (from moviepy->donkeycar==3.1.0) (2.4.1)
Requirement already satisfied: pytz>=2011k in /usr/local/lib/python3.6/dist-packages (from pandas->donkeycar==3.1.0) (2018.9)
Requirement already satisfied: python-dateutil>=2.5.0 in /usr/local/lib/python3.6/dist-packages (from pandas->donkeycar==3.1.0) (2.5.3)
Building wheels for collected packages: paho-mqtt
  Building wheel for paho-mqtt (setup.py) ... done
  Created wheel for paho-mqtt: filename=paho_mqtt-1.4.0-cp36-none-any.whl size=48333 sha256=9a67d0c95fae2b9495c20980895d9569ef53859cbc22bb57fc2466d7a581af7b
  Stored in directory: /root/.cache/pip/wheels/82/e5/de/d90d0f397648a1b58ffeea1b5742ac8c77f71fd43b550fa5a5
Successfully built paho-mqtt
Installing collected packages: paho-mqtt, donkeycar
  Running setup.py develop for donkeycar
Successfully installed donkeycar paho-mqtt-1.4.0

Create a project

I used mycar as the project name, you can change it, but you need to modify the code after renamingIn [5]:

!donkey createcar --path /content/mycar

using donkey v3.1.0 ...
Creating car folder: /content/mycar
making dir  /content/mycar
Creating data & model folders.
making dir  /content/mycar/models
making dir  /content/mycar/data
making dir  /content/mycar/logs
Copying car application template: complete
Copying car config defaults. Adjust these before starting your car.
Copying train script. Adjust these before starting your car.
Copying my car config overrides
Donkey setup complete.

Prepare data: Upload data.zip and unzip

Now you need to package the data directory that you collected from pi, save it as data.zip.

Run the following command on the pi data directory:

$ zip -r data.zip tub_3_19-08-17/

Then copy it back to your computer, ready to upload to Colab

Upload data.zip to Colab

Run the following code, you will see an upload button, click to upload the data.zip you just packagedIn [7]:

from google.colab import files

if(os.path.exists("/content/data.zip")):

os.remove("/content/data.zip")

if(os.path.exists("/content/mycar/data/data.zip")):

os.remove("/content/mycar/data/data.zip")

uploaded = files.upload()

WORK_FOLDER = "/content/mycar/data/"

if(os.path.exists(WORK_FOLDER) == False):

!mv /content/data.zip /content/mycar/data/

Clean up the uploaded files

You need to ensure that the content/mycar/data directory has a tub directory, and the directory contains images and corresponding json files

data.zip is not neededIn [0]:

!rm /content/mycar/data/data.zip

Train the model

In [21]:

!python /content/mycar/manage.py train --model /content/mycar/models/mypilot.h5

using donkey v3.1.0 ...
loading config file: /content/mycar/config.py
loading personal config over-rides

config loaded
WARNING: Logging before flag parsing goes to stderr.
W0818 04:53:15.944086 140399927523200 deprecation_wrapper.py:119] From /content/donkey/donkeycar/parts/keras.py:18: The name tf.ConfigProto is deprecated. Please use tf.compat.v1.ConfigProto instead.

W0818 04:53:15.944333 140399927523200 deprecation_wrapper.py:119] From /content/donkey/donkeycar/parts/keras.py:18: The name tf.Session is deprecated. Please use tf.compat.v1.Session instead.

2019-08-18 04:53:15.954857: I tensorflow/core/platform/cpu_feature_guard.cc:142] Your CPU supports instructions that this TensorFlow binary was not compiled to use: AVX2 FMA
2019-08-18 04:53:15.959505: I tensorflow/stream_executor/platform/default/dso_loader.cc:42] Successfully opened dynamic library libcuda.so.1
2019-08-18 04:53:16.083690: I tensorflow/stream_executor/cuda/cuda_gpu_executor.cc:1005] successful NUMA node read from SysFS had negative value (-1), but there must be at least one NUMA node, so returning NUMA node zero
2019-08-18 04:53:16.084227: I tensorflow/compiler/xla/service/service.cc:168] XLA service 0x2455100 executing computations on platform CUDA. Devices:
2019-08-18 04:53:16.084262: I tensorflow/compiler/xla/service/service.cc:175]   StreamExecutor device (0): Tesla T4, Compute Capability 7.5
2019-08-18 04:53:16.086194: I tensorflow/core/platform/profile_utils/cpu_utils.cc:94] CPU Frequency: 2300000000 Hz
2019-08-18 04:53:16.086460: I tensorflow/compiler/xla/service/service.cc:168] XLA service 0x65e6380 executing computations on platform Host. Devices:
2019-08-18 04:53:16.086508: I tensorflow/compiler/xla/service/service.cc:175]   StreamExecutor device (0): <undefined>, <undefined>
2019-08-18 04:53:16.086686: I tensorflow/stream_executor/cuda/cuda_gpu_executor.cc:1005] successful NUMA node read from SysFS had negative value (-1), but there must be at least one NUMA node, so returning NUMA node zero
2019-08-18 04:53:16.087039: I tensorflow/core/common_runtime/gpu/gpu_device.cc:1640] Found device 0 with properties: 
name: Tesla T4 major: 7 minor: 5 memoryClockRate(GHz): 1.59
pciBusID: 0000:00:04.0
2019-08-18 04:53:16.087321: I tensorflow/stream_executor/platform/default/dso_loader.cc:42] Successfully opened dynamic library libcudart.so.10.0
2019-08-18 04:53:16.088548: I tensorflow/stream_executor/platform/default/dso_loader.cc:42] Successfully opened dynamic library libcublas.so.10.0
2019-08-18 04:53:16.089621: I tensorflow/stream_executor/platform/default/dso_loader.cc:42] Successfully opened dynamic library libcufft.so.10.0
2019-08-18 04:53:16.089935: I tensorflow/stream_executor/platform/default/dso_loader.cc:42] Successfully opened dynamic library libcurand.so.10.0
2019-08-18 04:53:16.091399: I tensorflow/stream_executor/platform/default/dso_loader.cc:42] Successfully opened dynamic library libcusolver.so.10.0
2019-08-18 04:53:16.092394: I tensorflow/stream_executor/platform/default/dso_loader.cc:42] Successfully opened dynamic library libcusparse.so.10.0
2019-08-18 04:53:16.095470: I tensorflow/stream_executor/platform/default/dso_loader.cc:42] Successfully opened dynamic library libcudnn.so.7
2019-08-18 04:53:16.095606: I tensorflow/stream_executor/cuda/cuda_gpu_executor.cc:1005] successful NUMA node read from SysFS had negative value (-1), but there must be at least one NUMA node, so returning NUMA node zero
2019-08-18 04:53:16.096009: I tensorflow/stream_executor/cuda/cuda_gpu_executor.cc:1005] successful NUMA node read from SysFS had negative value (-1), but there must be at least one NUMA node, so returning NUMA node zero
2019-08-18 04:53:16.096350: I tensorflow/core/common_runtime/gpu/gpu_device.cc:1763] Adding visible gpu devices: 0
2019-08-18 04:53:16.096401: I tensorflow/stream_executor/platform/default/dso_loader.cc:42] Successfully opened dynamic library libcudart.so.10.0
2019-08-18 04:53:16.097166: I tensorflow/core/common_runtime/gpu/gpu_device.cc:1181] Device interconnect StreamExecutor with strength 1 edge matrix:
2019-08-18 04:53:16.097190: I tensorflow/core/common_runtime/gpu/gpu_device.cc:1187]      0 
2019-08-18 04:53:16.097201: I tensorflow/core/common_runtime/gpu/gpu_device.cc:1200] 0:   N 
2019-08-18 04:53:16.097482: I tensorflow/stream_executor/cuda/cuda_gpu_executor.cc:1005] successful NUMA node read from SysFS had negative value (-1), but there must be at least one NUMA node, so returning NUMA node zero
2019-08-18 04:53:16.097878: I tensorflow/stream_executor/cuda/cuda_gpu_executor.cc:1005] successful NUMA node read from SysFS had negative value (-1), but there must be at least one NUMA node, so returning NUMA node zero
2019-08-18 04:53:16.098226: I tensorflow/core/common_runtime/gpu/gpu_device.cc:1326] Created TensorFlow device (/job:localhost/replica:0/task:0/device:GPU:0 with 14089 MB memory) -> physical GPU (device: 0, name: Tesla T4, pci bus id: 0000:00:04.0, compute capability: 7.5)
"get_model_by_type" model Type is: linear
W0818 04:53:16.444941 140399927523200 deprecation.py:506] From /usr/local/lib/python3.6/dist-packages/tensorflow/python/ops/init_ops.py:1251: calling VarianceScaling.__init__ (from tensorflow.python.ops.init_ops) with dtype is deprecated and will be removed in a future version.
Instructions for updating:
Call initializer instance with the dtype argument instead of passing it to the constructor
training with model type <class 'donkeycar.parts.keras.KerasLinear'>
Model: "model"
__________________________________________________________________________________________________
Layer (type)                    Output Shape         Param #     Connected to                     
==================================================================================================
img_in (InputLayer)             [(None, 120, 160, 3) 0                                            
__________________________________________________________________________________________________
conv2d_1 (Conv2D)               (None, 58, 78, 24)   1824        img_in[0][0]                     
__________________________________________________________________________________________________
dropout (Dropout)               (None, 58, 78, 24)   0           conv2d_1[0][0]                   
__________________________________________________________________________________________________
conv2d_2 (Conv2D)               (None, 27, 37, 32)   19232       dropout[0][0]                    
__________________________________________________________________________________________________
dropout_1 (Dropout)             (None, 27, 37, 32)   0           conv2d_2[0][0]                   
__________________________________________________________________________________________________
conv2d_3 (Conv2D)               (None, 12, 17, 64)   51264       dropout_1[0][0]                  
__________________________________________________________________________________________________
dropout_2 (Dropout)             (None, 12, 17, 64)   0           conv2d_3[0][0]                   
__________________________________________________________________________________________________
conv2d_4 (Conv2D)               (None, 10, 15, 64)   36928       dropout_2[0][0]                  
__________________________________________________________________________________________________
dropout_3 (Dropout)             (None, 10, 15, 64)   0           conv2d_4[0][0]                   
__________________________________________________________________________________________________
conv2d_5 (Conv2D)               (None, 8, 13, 64)    36928       dropout_3[0][0]                  
__________________________________________________________________________________________________
dropout_4 (Dropout)             (None, 8, 13, 64)    0           conv2d_5[0][0]                   
__________________________________________________________________________________________________
flattened (Flatten)             (None, 6656)         0           dropout_4[0][0]                  
__________________________________________________________________________________________________
dense (Dense)                   (None, 100)          665700      flattened[0][0]                  
__________________________________________________________________________________________________
dropout_5 (Dropout)             (None, 100)          0           dense[0][0]                      
__________________________________________________________________________________________________
dense_1 (Dense)                 (None, 50)           5050        dropout_5[0][0]                  
__________________________________________________________________________________________________
dropout_6 (Dropout)             (None, 50)           0           dense_1[0][0]                    
__________________________________________________________________________________________________
n_outputs0 (Dense)              (None, 1)            51          dropout_6[0][0]                  
__________________________________________________________________________________________________
n_outputs1 (Dense)              (None, 1)            51          dropout_6[0][0]                  
==================================================================================================
Total params: 817,028
Trainable params: 817,028
Non-trainable params: 0
__________________________________________________________________________________________________
None
found 0 pickles writing json records and images in tub /content/mycar/data/tub_3_19-08-17
/content/mycar/data/tub_3_19-08-17
collating 5799 records ...
train: 4639, val: 1160
total records: 5799
steps_per_epoch 36
Epoch 1/100
2019-08-18 04:53:19.663907: I tensorflow/stream_executor/platform/default/dso_loader.cc:42] Successfully opened dynamic library libcublas.so.10.0
2019-08-18 04:53:19.984999: I tensorflow/stream_executor/platform/default/dso_loader.cc:42] Successfully opened dynamic library libcudnn.so.7
35/36 [============================>.] - ETA: 0s - loss: 0.1681 - n_outputs0_loss: 0.1555 - n_outputs1_loss: 0.0126
Epoch 00001: val_loss improved from inf to 0.14482, saving model to /content/mycar/models/mypilot.h5
36/36 [==============================] - 8s 213ms/step - loss: 0.1677 - n_outputs0_loss: 0.1553 - n_outputs1_loss: 0.0124 - val_loss: 0.1448 - val_n_outputs0_loss: 0.1409 - val_n_outputs1_loss: 0.0039
Epoch 2/100
34/36 [===========================>..] - ETA: 0s - loss: 0.1278 - n_outputs0_loss: 0.1234 - n_outputs1_loss: 0.0044
Epoch 00002: val_loss improved from 0.14482 to 0.08814, saving model to /content/mycar/models/mypilot.h5
36/36 [==============================] - 2s 53ms/step - loss: 0.1257 - n_outputs0_loss: 0.1214 - n_outputs1_loss: 0.0043 - val_loss: 0.0881 - val_n_outputs0_loss: 0.0870 - val_n_outputs1_loss: 0.0012
Epoch 3/100
35/36 [============================>.] - ETA: 0s - loss: 0.0943 - n_outputs0_loss: 0.0910 - n_outputs1_loss: 0.0033
Epoch 00003: val_loss improved from 0.08814 to 0.07490, saving model to /content/mycar/models/mypilot.h5
36/36 [==============================] - 2s 52ms/step - loss: 0.0938 - n_outputs0_loss: 0.0905 - n_outputs1_loss: 0.0033 - val_loss: 0.0749 - val_n_outputs0_loss: 0.0738 - val_n_outputs1_loss: 0.0011
Epoch 4/100
35/36 [============================>.] - ETA: 0s - loss: 0.0840 - n_outputs0_loss: 0.0813 - n_outputs1_loss: 0.0027
Epoch 00004: val_loss improved from 0.07490 to 0.07108, saving model to /content/mycar/models/mypilot.h5
36/36 [==============================] - 2s 51ms/step - loss: 0.0835 - n_outputs0_loss: 0.0808 - n_outputs1_loss: 0.0027 - val_loss: 0.0711 - val_n_outputs0_loss: 0.0702 - val_n_outputs1_loss: 8.9668e-04
Epoch 5/100
35/36 [============================>.] - ETA: 0s - loss: 0.0767 - n_outputs0_loss: 0.0741 - n_outputs1_loss: 0.0026
Epoch 00005: val_loss did not improve from 0.07108
36/36 [==============================] - 2s 50ms/step - loss: 0.0765 - n_outputs0_loss: 0.0739 - n_outputs1_loss: 0.0026 - val_loss: 0.0722 - val_n_outputs0_loss: 0.0717 - val_n_outputs1_loss: 5.4629e-04
Epoch 6/100
35/36 [============================>.] - ETA: 0s - loss: 0.0750 - n_outputs0_loss: 0.0727 - n_outputs1_loss: 0.0023
Epoch 00006: val_loss improved from 0.07108 to 0.06483, saving model to /content/mycar/models/mypilot.h5
36/36 [==============================] - 2s 52ms/step - loss: 0.0749 - n_outputs0_loss: 0.0725 - n_outputs1_loss: 0.0024 - val_loss: 0.0648 - val_n_outputs0_loss: 0.0641 - val_n_outputs1_loss: 7.5336e-04
Epoch 7/100
35/36 [============================>.] - ETA: 0s - loss: 0.0711 - n_outputs0_loss: 0.0689 - n_outputs1_loss: 0.0022
Epoch 00007: val_loss improved from 0.06483 to 0.06324, saving model to /content/mycar/models/mypilot.h5
36/36 [==============================] - 2s 52ms/step - loss: 0.0711 - n_outputs0_loss: 0.0689 - n_outputs1_loss: 0.0021 - val_loss: 0.0632 - val_n_outputs0_loss: 0.0626 - val_n_outputs1_loss: 5.9058e-04
Epoch 8/100
35/36 [============================>.] - ETA: 0s - loss: 0.0693 - n_outputs0_loss: 0.0675 - n_outputs1_loss: 0.0018
Epoch 00008: val_loss did not improve from 0.06324
36/36 [==============================] - 2s 51ms/step - loss: 0.0690 - n_outputs0_loss: 0.0672 - n_outputs1_loss: 0.0018 - val_loss: 0.0644 - val_n_outputs0_loss: 0.0637 - val_n_outputs1_loss: 7.8261e-04
Epoch 9/100
35/36 [============================>.] - ETA: 0s - loss: 0.0693 - n_outputs0_loss: 0.0675 - n_outputs1_loss: 0.0018
Epoch 00009: val_loss did not improve from 0.06324
36/36 [==============================] - 2s 50ms/step - loss: 0.0690 - n_outputs0_loss: 0.0672 - n_outputs1_loss: 0.0018 - val_loss: 0.0653 - val_n_outputs0_loss: 0.0646 - val_n_outputs1_loss: 6.6657e-04
Epoch 10/100
34/36 [===========================>..] - ETA: 0s - loss: 0.0651 - n_outputs0_loss: 0.0633 - n_outputs1_loss: 0.0018
Epoch 00010: val_loss did not improve from 0.06324
36/36 [==============================] - 2s 51ms/step - loss: 0.0657 - n_outputs0_loss: 0.0639 - n_outputs1_loss: 0.0018 - val_loss: 0.0699 - val_n_outputs0_loss: 0.0692 - val_n_outputs1_loss: 6.9729e-04
Epoch 11/100
35/36 [============================>.] - ETA: 0s - loss: 0.0630 - n_outputs0_loss: 0.0612 - n_outputs1_loss: 0.0018
Epoch 00011: val_loss did not improve from 0.06324
36/36 [==============================] - 2s 51ms/step - loss: 0.0630 - n_outputs0_loss: 0.0612 - n_outputs1_loss: 0.0018 - val_loss: 0.0633 - val_n_outputs0_loss: 0.0619 - val_n_outputs1_loss: 0.0014
Epoch 12/100
35/36 [============================>.] - ETA: 0s - loss: 0.0643 - n_outputs0_loss: 0.0626 - n_outputs1_loss: 0.0016
Epoch 00012: val_loss improved from 0.06324 to 0.06034, saving model to /content/mycar/models/mypilot.h5
36/36 [==============================] - 2s 52ms/step - loss: 0.0644 - n_outputs0_loss: 0.0628 - n_outputs1_loss: 0.0017 - val_loss: 0.0603 - val_n_outputs0_loss: 0.0598 - val_n_outputs1_loss: 4.9525e-04
Epoch 13/100
35/36 [============================>.] - ETA: 0s - loss: 0.0611 - n_outputs0_loss: 0.0597 - n_outputs1_loss: 0.0014
Epoch 00013: val_loss improved from 0.06034 to 0.05636, saving model to /content/mycar/models/mypilot.h5
36/36 [==============================] - 2s 52ms/step - loss: 0.0613 - n_outputs0_loss: 0.0599 - n_outputs1_loss: 0.0014 - val_loss: 0.0564 - val_n_outputs0_loss: 0.0557 - val_n_outputs1_loss: 6.3083e-04
Epoch 14/100
34/36 [===========================>..] - ETA: 0s - loss: 0.0593 - n_outputs0_loss: 0.0580 - n_outputs1_loss: 0.0013
Epoch 00014: val_loss did not improve from 0.05636
36/36 [==============================] - 2s 51ms/step - loss: 0.0590 - n_outputs0_loss: 0.0577 - n_outputs1_loss: 0.0013 - val_loss: 0.0580 - val_n_outputs0_loss: 0.0575 - val_n_outputs1_loss: 5.4033e-04
Epoch 15/100
34/36 [===========================>..] - ETA: 0s - loss: 0.0552 - n_outputs0_loss: 0.0540 - n_outputs1_loss: 0.0012
Epoch 00015: val_loss did not improve from 0.05636
36/36 [==============================] - 2s 51ms/step - loss: 0.0555 - n_outputs0_loss: 0.0542 - n_outputs1_loss: 0.0012 - val_loss: 0.0565 - val_n_outputs0_loss: 0.0559 - val_n_outputs1_loss: 5.6679e-04
Epoch 16/100
35/36 [============================>.] - ETA: 0s - loss: 0.0538 - n_outputs0_loss: 0.0527 - n_outputs1_loss: 0.0012
Epoch 00016: val_loss did not improve from 0.05636
36/36 [==============================] - 2s 50ms/step - loss: 0.0538 - n_outputs0_loss: 0.0526 - n_outputs1_loss: 0.0012 - val_loss: 0.0624 - val_n_outputs0_loss: 0.0619 - val_n_outputs1_loss: 5.0014e-04
Epoch 17/100
35/36 [============================>.] - ETA: 0s - loss: 0.0536 - n_outputs0_loss: 0.0525 - n_outputs1_loss: 0.0011
Epoch 00017: val_loss improved from 0.05636 to 0.05615, saving model to /content/mycar/models/mypilot.h5
36/36 [==============================] - 2s 53ms/step - loss: 0.0534 - n_outputs0_loss: 0.0523 - n_outputs1_loss: 0.0011 - val_loss: 0.0561 - val_n_outputs0_loss: 0.0556 - val_n_outputs1_loss: 5.2067e-04
Epoch 18/100
35/36 [============================>.] - ETA: 0s - loss: 0.0502 - n_outputs0_loss: 0.0492 - n_outputs1_loss: 0.0011
Epoch 00018: val_loss improved from 0.05615 to 0.05594, saving model to /content/mycar/models/mypilot.h5
36/36 [==============================] - 2s 52ms/step - loss: 0.0501 - n_outputs0_loss: 0.0490 - n_outputs1_loss: 0.0011 - val_loss: 0.0559 - val_n_outputs0_loss: 0.0555 - val_n_outputs1_loss: 4.4089e-04
Epoch 00018: early stopping
Training completed in 0:00:40.


----------- Best Eval Loss :0.055939 ---------
<Figure size 640x480 with 1 Axes>

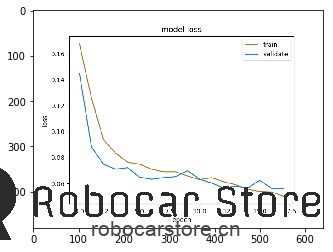
Display the Loss curve of the training result

In [26]:

import matplotlib.pyplot as plt

list_of_png = glob.glob('/content/mycar/models/*png')

latest_png = max(list_of_png, key=os.path.getctime)

image = cv2.imread(latest_png)

/content/mycar/models/mypilot.h5_loss_acc_0.055939.png

Out[26]:

<matplotlib.image.AxesImage at 0x7f867c896be0>
robocarstore/173807730625008222

Put the trained model back into Donkey Car.

Once the model is trained, you can find the trained model in the mycar/models directory
1. Download the mypilot file to your PC or Mac

  1. Copy the model from your PC or Mac to your pi

Finally, use the Autopilot mode to drive Donkey car

Enjoy!

Play with JetBot Autonomous Driving (1)Prepare the DIY BOM list

robocarstore/173807773325122723

JetBot is an easy-to-use machine learning autonomous car, I feel it's easier to get started than Donkey Car.
This article lists all the electronic components, 3D printed parts, and hardware that I needed when assembling JetBot.
To avoid everyone taking detours, I will also list the detailed model parameters.

First, let's take a look at the "零件全家福" to get an overview:

robocarstore/173807775925330624

Here is the list of all parts and model parameters:

robocarstore/173807779624892425

In the installation process, I also used some tools, such as: M3 wrench, M2 wrench, M3 hex nut wrench, cross screwdriver, flat screwdriver, high temperature tape, soldering iron (some parts need to be soldered).

以上,就是我组装的这台JetBot用到的所有零件和工具。

Of course, you can also refer to the detailed Nvidia official Git part list, which proposes some other part solutions:
https://github.com/NVIDIA-AI-IOT/jetbot/wiki/bill-of-materials

Next, I will introduce how to install JetBot step by step.

to be continued…

Play with JetBot Autonomous Driving (2) Assemble Jetbot Car

robocarstore/173807852624587444

This article will detail the hardware installation process of JetBot, and provide a full installation video.

Due to the main camera malfunction during filming, the video content is unavailable, so only the material from the secondary camera is used, and the quality is somewhat unsatisfactory. Please forgive me.

You can also refer to the installation process of the official Git to complement the shortcomings (some pictures in this article are also from here):
https://github.com/NVIDIA-AI-IOT/jetbot/wiki/hardware-setup

Required Tools

M3 wrench, M2 wrench, M3 hex nut wrench, cross screwdriver, flat screwdriver, insulating tape, high temperature tape, 3M double-sided tape, soldering iron (some parts need to be soldered).

Start Assembling

Step – 1 Install Wireless Network Card

1,Remove the chip module (the entire module with the heatsink) from the Jetson Nano

First, unscrew the 2 screws, then pull the side lock (侧锁) apart, the chip module will automatically pop up at an angle, slide the chip module out along this angle. robocarstore/173807821424761926 robocarstore/173807825424765927 robocarstore/173807827724901728 robocarstore/173807828824814429

2,Install WiFi Module AC8265

Connect the Intel WiFi module AC8265 to the antenna, wrap it with high temperature tape to reinforce it, avoid falling off, and cut the high temperature tape on the groove. Screw the screws of the Jetson Nano base, plug the WiFi module into the WiFi slot, and screw the screws back in to fix the AC8265 WiFi module. robocarstore/173807831124775830 robocarstore/173807831924893431 robocarstore/173807832725044032 robocarstore/173807836024830233

3,Install the chip module back to the Jetson Nano base, and fix the antenna

Plug the chip module back into the slot, press flat, the side lock (侧锁) will automatically snap back in place, screw the 2 screws back in to fix the chip module, and then use high temperature tape to fix the antenna to the heatsink. robocarstore/173807836924645634

robocarstore/173807838324670435

robocarstore/173807839225296536

Step – 2 Connect Power Line to Motor Driver

4,Solder the Motor Driver Module

Here you need to solder, when you buy this motor driver module, some accessories will be included, you only need to solder the interface shown in Figure 1, and the final processing is shown in Figure 4.

robocarstore/173807841224729437

robocarstore/173807842224823038

robocarstore/173807843724698939

robocarstore/173807844433350340

5,Unwrap the Positive and Negative Poles of the MicroUSB Power Line

As shown below, peel off the positive and negative wires, and fix the other wires with insulating tape to prevent short circuits. Generally, it is red positive and black negative, if you are not sure, please refer to the MicroUSB data line connection diagram in the picture, use a multimeter to measure. You can also connect an LED light, use the characteristics of the diode, and turn on the power to test whether the positive and negative poles are correct.

robocarstore/173807845024671941

Note: The positive and negative poles must be clearly identified, if you get it wrong, it may burn your Jetson Nano, or even cause a power explosion.

Make sure to get it right!

Make sure to get it right!

Make sure to get it right!

Important things are said three times! If you have no experience, you must ask someone with experience for help!

6,Motor Driver Module Power Interface Connection to MicroUSB Data Line

First, look at the interface of this motor driver module, it is actually an integrated board of PCA9685 and TB6612.

robocarstore/173807849325676742

However, assembling JetBot only needs a few interfaces. This step only connects the MicroUSB data line as an external power line (3v3接_正极_、GND接_负极_).

robocarstore/173807851424798543

Step – 3 Install TT Motor

7,Install TT Motor

Prepare the 3D printed parts "chassis" (chassis.stl) and TT motor. Install the TT motor on the "chassis", fix it with M3 screws and M3 hex nuts, please be gentle, the 3D printed chassis is not as strong as you might think.

robocarstore/173807852624587444

robocarstore/173807854224561745

robocarstore/173807855324679046

Step – 4 Install Motor Driver Module

8,Install Motor Driver Module on the "chassis"

robocarstore/173807856624662147

First, use M2*6 self-tapping screws to install the motor driver module on the "chassis" (as shown in Figure 1).

Step – 5 TT Motor and Motor Driver Module Connection

9,TT Motor and Motor Driver Module Connection

According to the wiring method shown in the figure, connect the TT motor to the driver module (even if you connect it incorrectly, it is not a big deal, you can check whether the direction is correct in the subsequent application instance, and then adjust it).

robocarstore/173807858324621348

Note: In the installation video, the motor driver installation direction is different from the picture, please align with the direction shown in the article.

Step – 6 Install Wheels and Pre-connect Dupont Lines

10,Install Omnidirectional Wheels

Prepare the "caster shroud 60mm" (caster_shroud_60mm.stl), "caster base 60mm" (caster_base_60mm.stl), and polyoxymethylene ball (POM ball). Place the "caster shroud 60mm" -> polyoxymethylene ball -> "caster base 60mm" in the groove of the chassis, and then use "M2*8 self-tapping screws" to fix it. robocarstore/173807863324608149

robocarstore/173807865324939550

robocarstore/173807866124643751

robocarstore/173807867024781552

11,Motor Driver Module Pre-connect Dupont Lines

First, use Dupont lines to pre-connect the four pins on the motor driver module, which are: 3.3v, GND, SDA, SCL. Pre-connect it, wait for later use.

robocarstore/173807868126285253

12,Install the Left and Right Wheels

Please install the wheels carefully, so as not to exert too much force and crush the "chassis".

robocarstore/173807871924726254

Step – 7 Jetson Nano、OLED、电机驱动模块接线

13,Fix the Jetson Nano on the "chassis"

Use M2*6 self-tapping screws to fix the Jetson Nano on the "chassis". robocarstore/173807872924554455 robocarstore/173807875224607056

14,OLED Display Pre-wiring

Before connecting the wires, we need to use long double-row bent pins to weld the OLED Display (of course, you can also directly weld Dupont lines). robocarstore/173807876024663757 robocarstore/173807877324632258

15,OLED Display and Motor Driver Module Connection

First, understand the pin of the OLED Display.

robocarstore/173807879224744959

Then refer to the wiring diagram shown below, connect the OLED Display and the motor driver module.

robocarstore/173807879924605060

16,OLED and Jetson Nano Connection

Plug the OLED into the pins shown in the figure (the pins of the OLED Display are one-to-one corresponding), and install it according to Figure 2. robocarstore/173807881124578461 robocarstore/173807883024886862

Step – 8 Install Pi V2 Camera

17,Fix the Camera on the "chassis"

First, use M2*6 self-tapping screws to fix the Pi V2 camera on the "camera mount" (camera_mount.stl), then connect the video line to the Jetson Nano, and finally use M2*6 self-tapping screws to fix the "camera mount" on the "chassis". robocarstore/173807883824550163 robocarstore/173807885124829464 robocarstore/173807885824666465

Step – 9 Install Mobile Power

18,Install the Mobile Power in the "chassis"

This is the last step, and also the simplest step. Put the mobile power into the power slot, and fix it with tape or 3M double-sided tape.

robocarstore/173807886524635366


The next article will introduce how to burn the Jetson Nano system onto the MicroSD card.

to be continue……

Play with JetBot Autonomous Driving (3)System Installation and Configuration

robocarstore/173807986231205671

In the previous article, we completed the hardware installation of JetBot. Now, we will continue to complete the system installation and configuration of JetBot. This process includes burning the JetBot SD card image, starting Jetson Nano, and making some necessary settings to ensure that JetBot can run correctly. Please follow the steps below to complete these operations.

Burning the JetBot SD card image

1,Prepare a 64GB+ MicroSD card

2,Download the JetBot image (6.87GB):

Baidu Netdisk download:
Link:https://pan.baidu.com/s/1O8DVn28kY2-5-WBwUMZg9w Password:dydn

If the prompt indicates that the image you are burning is larger than your MicroSD card, please try downloading this image, decompressing it to 63GB:

Baidu Netdisk download:
Link:https://pan.baidu.com/s/1FqeTe4aHYhkEFKxCCEn7XQ Password:utvz

3,Download the SD card formatting software "SD Memory Card Formatter"

To correctly format your MicroSD card.
Official website: https://www.sdcard.org/downloads/formatter/

4,Download the SD card burning software "Etcher"

To write the .img image file to the MicroSD card.
Official website: https://www.balena.io/etcher/

5,Start burning

Use a card reader to read the MicroSD card. robocarstore/173807982431236168

robocarstore/173807983731180869

Use "SD Memory Card Formatter" to format your SD card. If the capacity read by the computer is the same as the nominal capacity of the MicroSD card, you can skip this step.

Open "Etcher", select the JetBot image file you downloaded, then select the MicroSD card to be written, click [Flash!], and start burning.

robocarstore/173807984631182970

If the prompt indicates that the image is larger than the MicroSD card, please use the 63GB image file.

This is a long wait, the entire burning process took me over 3 hours, possibly using a USB3.0 or using a Windows system, the burning time will be faster.

6,Remove the SD card

Start Jetson Nano

7,Insert the MicroSD card into Jetson Nano

Insert the MicroSD card you just burned into the Jetson Nano's MicroSD card slot.

robocarstore/173807986231205671

8,Connect the monitor, keyboard, mouse, and power to Jetson Nano

Note that the power connection at this time is using a common mobile phone charger, 5V power supply, 2A current socket power head for power supply.

robocarstore/173807987531203572

It is recommended to start Jetson Nano without connecting the PiOLED/motor driver module. This ensures that the system can start correctly without worrying about other hardware issues. After normal shutdown, reconnect the PiOLED/motor driver, check the wiring carefully, and then power up again.

Setting up JetBot to connect to local Wifi

9,开机账号

After powering on, you will see the NVIDIA logo on the display, which is actually an Ubuntu system. Wait a moment, and you will see the input password interface. The account and password are both: jetbot

10,Enter the system and set up WiFi

Find the network connection icon in the upper right corner, set up the connection to the WiFi you are using, so that the next time you start the JetBot, it will automatically connect to the WiFi you set and display the obtained LAN IP on the PiOLED screen.

11,Shutdown

When you have set up WiFi, you can click the power icon in the upper right corner, open it to find "shutdonw" to shut down.

12,Remove the JetBot's power supply cable, monitor, mouse, and keyboard

Ensure that the power supply cable, monitor video cable, and wireless mouse and keyboard are all removed when the machine is shut down.

13,Power up JetBot using a mobile power supply via a MicroUSB data cable

This time, two MicroUSB data cables are used to connect the mobile power supply, one for powering the JetBot, and the other for powering the motor driver module.

14,Wait for JetBot to start up, about 2 minutes

15,Check the IP address displayed on the PiOLED

After about 2 minutes of waiting, you can see the current JetBot information, including the IP address, memory usage, etc., displayed on the PiOLED screen.

robocarstore/173807988731362373

16,Enter the IP address in the browser: http://:8888

For example, the IP address of my JetBot is: 192.168.199.142, enter the address in the browser: http://192.168.199.142:8888/

robocarstore/173807990431293974

Setting up the power mode

To ensure that the Jetson Nano does not draw more current than the battery pack, please set the Jetson Nano to 5W mode by calling the following command.

17,Connect to your JetBot via the browser: http://:8888

18,Click + to open a console, run a terminal

robocarstore/173807991931385875

20,Set 5W mode, enter the following command

sudo nvpmodel -m1

robocarstore/173807993431444676

It will prompt you to enter a password, the password is: jetbot

21,Check if the setting is successful, enter the following command

sudo nvpmodel -q

robocarstore/173807994231326677

You can see "NV Power Mode: 5W", which means the setting is successful.

Install the latest version of software (This step is optional)

Of course, you can also choose not to update, directly use the system's original version.

22,Run a terminal

23,Download and install the latest version, enter the following command

git clone https://github.com/NVIDIA-AI-IOT/jetbot

sudo python3 setup.py install

24,Overwrite the old version of the program, enter the following command

sudo apt-get install rsync

rsync jetbot/notebooks ~/Notebooks

All preparations are complete, the next time will open the door to machine learning.

to be continue……

Play with JetBot Autonomous Driving (4)Drive your JetBot

robocarstore/173808120633923478

This article explains how to use jupyter lab in the browser to control your JetBot and how to program your JetBot through python.

Recognize the interface of Jupyter Lab

We have already used jupyter lab through the browser in the previous article, and we will continue to use this tool. Therefore, it is necessary to understand the interface of jupyter lab, and have an impression of the names of different areas, which will make your subsequent operations more convenient.

robocarstore/173808120633923478

Roughly explain:

  • Top menu:Includes all operations of jupyter lab, such as creating, saving, closing the running kernel, etc.
  • Console:It is a shortcut for quickly creating a notebook and opening a Terminal (terminal, or command line).
  • Quick toolbar:It is a shortcut, from left to right, which represents "create a console", "create a folder", "upload a file", "refresh".
  • Side tab:You can click on "file browser", "running kernel list", "command list", "window list" to open them.

Next, we will explain what the python statements in the notebook mean and what they are used for.

You can view the complete notebook here, with a better style:

https://github.com/ling3ye/jetbot/blob/master/notebooks/basic_motion/basic_motion.ipynb

You can also download this notebook to replace your original basic motion notebook.

Basic Movement

Welcome to the Jetbot programming interface based on jupyter lab.
This type of document is called "jupyter Notebook", which is a document that combines text, code, and graphics. It is more orderly and simple than the method of only having code and comments. If you are not familiar with 'Jupyter', I recommend you to click the "help" drop-down menu in the top menu bar, which has many usage references for Jupyter lab.

And in this notebook, we will introduce the basic programming knowledge of JetBot and how to program your JetBot through python.

Load the Robot class

Before starting to program JetBot, we need to import the "Robot" class. This class allows us to easily control the motors of JetBot! It is included in the "jetbot" package.

If you are a Python beginner, a package is a folder containing code files.
These code files are called modules (models).

To load the Robot class, please highlight the cell below and press ctrl + enter or the play icon above. This operation will execute the code in the cell.

Now that we have loaded the Robot class, we can use the following statement to initialize this instance (instance).

Now that we have created a Robot instance named "Robot", we can use this instance to control our robot (JetBot). Execute the following command to make JetBot rotate counterclockwise at 30% of its maximum speed.

Note: This command will make the robot move. Please ensure there is enough space for the robot to move, to avoid falling and damaging the robot, or simply put it on the ground.

Great, you should now see the JetBot rotating counterclockwise!

If your robot did not turn left, this means that one or both of the motors are not working properly. Try turning off the power and find the motor that is not working properly, then swap the wires of the positive and negative poles.

Reminder: Please ensure that the wires are checked carefully and the wires should be unplugged when the power is turned off.

Now, execute the following stop method to stop the robot.

Sometimes we may want to move the robot for a certain period of time. To do this, we can use the time package in Python. Execute the following code to load time.

This package defines the sleep function, which causes the code to stop for a specified number of seconds before running the next command. Try the following command combination to make the robot turn left for half a second.

Great, you should now see the JetBot left turn for a moment, then stop.

The robot class also has right, forward, and backwards methods. Try creating your own cell, refer to the previous code, and make the robot move forward at 50% speed for one second.

To create a new cell, click on the highlighted bar on the side and press "b" or click the "+" icon in the toolbar above the notebook. Once done, try to enter the code that you think will make the robot move forward at 50% speed for one second, and then execute it to verify if the code you entered is correct.

Control each motor separately

Above we saw how to use left, right etc. commands to control JetBot. But what if we want to set the speed of each motor separately? There are actually two ways to do this.

The first method is to call the set_motors method. For example, to turn left for one second, we can set the left motor speed to 30% and the right motor to 60%, which will achieve a different turning angle, as shown below.

robot.set_motors(0.3, 0.6)

Great! You should now see the JetBot turn left. But actually we can use another way to achieve the same result.

In the Robot class, there are two properties named left_motor and right_motor, which represent the speed values of the left and right motors. These properties are instances of the Motor class, each of which contains a value value. When this value changes, it triggers events, which reassign the motor speed value.

So in this motor class, we attach a function that will update the motor command whenever the value changes. Therefore, to achieve the same result as we did above, we can execute the following.

robot.left_motor.value = 0.3

robot.right_motor.value = 0.6

robot.left_motor.value = 0.0

robot.right_motor.value = 0.0

You should now see the JetBot move in the same way!

Use the traitlets library to connect to HTML controls to operate the motors

Next, we will introduce a very cool feature, which is that we can make some graphical small buttons (controls) on this page using Jupyter Notebooks, and use traitlets to connect these small widgets to control the operation. This way, we can control our car through the buttons on the web page, which will be very convenient and fun.

To illustrate how to write the program, we first create and display two sliders for controlling the motors.

import ipywidgets.widgets as widgets

from IPython.display import display

# create two sliders with range [-1.0, 1.0]

left_slider = widgets.FloatSlider(description='left', min=\-1.0, max=1.0, step=0.01, orientation='vertical')

right_slider = widgets.FloatSlider(description='right', min=\-1.0, max=1.0, step=0.01, orientation='vertical')

# create a horizontal box container to place the sliders next to eachother

slider_container = widgets.HBox([left_slider, right_slider])

# display the container in this cell's output

display(slider_container)

You should now see two vertical sliders displayed above.

Tip: In Jupyter Lab, you can actually pop out the cell to other windows, such as these two sliders. Although they are not in the same window, they are still connected to this notebook. The specific operation is to move the mouse to the cell (for example: slider) and right-click, select "Create new view for output" (Create new view for output), and then drag the window to the place you are satisfied with.

Try clicking and dragging the sliders up and down, you will see the value change. Note that the motors of the JetBot are not responding when we move the sliders, because we have not connected them to the motors yet! We will achieve this by using the link function in the traitlets package below.

left_link = traitlets.link((left_slider, 'value'), (robot.left_motor, 'value'))

right_link = traitlets.link((right_slider, 'value'), (robot.right_motor, 'value'))

Now try dragging the sliders (you need to move them slowly, otherwise your JetBot will suddenly run out of bounds and cause damage), you should see the corresponding motors turning!

We created the link function above actually creates a two-way link! This means that if we set the motor value somewhere else, the slider will update accordingly! Try executing the following code block:

Executing the above code should see the slider change, responding to the motor speed value. If we want to disconnect this connection, we can call the unlink method to disconnect each connection one by one.

But if we don't want a two-way connection, for example, we just want to use the slider to display the motor speed value, but not to control it, then to achieve this function, we can use the dlink function, the left is the source, the right is the target (the data comes from the motor, and then it is displayed on the target).

left_link = traitlets.dlink((robot.left_motor, 'value'), (left_slider, 'value'))

right_link = traitlets.dlink((robot.right_motor, 'value'), (right_slider, 'value'))

Now you can move the sliders up and down, you should see that the robot's motors have no reaction. But when we set the motor speed value and execute it, the slider will respond to the corresponding numerical update.

Add functions to events

Another way to use traitlets is to attach functions to events (for example forward). As soon as the object changes, the function will be called, and some information about the change will be passed, such as the old value and the new value.

Let's create some buttons to control the robot displayed in the notebook.

button_layout = widgets.Layout(width='100px', height='80px', align_self='center')

stop_button = widgets.Button(description='stop', button_style='danger', layout=button_layout)

forward_button = widgets.Button(description='forward',

backward_button = widgets.Button(description='backward', layout=button_layout)

left_button = widgets.Button(description='left', layout=button_layout)

right_button = widgets.Button(description='right', layout=button_layout)

middle_box = widgets.HBox([left_button, stop_button, right_button],

layout=widgets.Layout(align_self='center'))

controls_box = widgets.VBox([forward_button, middle_box, backward_button])

You should now see a set of robot control buttons displayed above, but clicking the buttons will not do anything. To control, we need to create some functions attached to the on_click event of the buttons.

def step_forward(change):

def step_backward(change):

Now that we have defined those functions, let's attach them to the on_click event of each button.

# link buttons to actions

stop_button.on_click(stop)

forward_button.on_click(step_forward) backward_button.on_click(step_backward) left_button.on_click(step_left)

right_button.on_click(step_right)

Now, when you click each button, you should see the JetBot move accordingly.

Heartbeat switch

Here we show how to use the 'heartbeat' package to stop the movement of the JetBot. This is a simple way to detect if the JetBot is still connected to the browser. You can adjust the heartbeat period (in seconds) using the slider shown below. If the heartbeat cannot communicate back and forth between the browser, the heartbeat's status property will be set to dead. Once the connection is restored, the status property will be set to alive.

from jetbot import Heartbeat

# this function will be called when heartbeat 'alive' status changes

def handle_heartbeat_status(change):

if change['new'] == Heartbeat.Status.dead:

heartbeat.observe(handle_heartbeat_status, names='status')

period_slider = widgets.FloatSlider(description='period', min=0.001, max=0.5, step=0.01, value=0.5)

traitlets.dlink((period_slider, 'value'), (heartbeat, 'period'))

display(period_slider, heartbeat.pulseout)

Try executing the following code to start the motor, then lower the slider to see what happens. You can also try turning off your robot or computer.

Summary

This is a simple notebook example, I hope it will help you build confidence in programming your JetBot.

Play with JetBot Autonomous Driving (1)Prepare the DIY BOM list

robocarstore/173807773325122723

JetBot is an easy-to-use machine learning autonomous car, I feel it's easier to get started than Donkey Car.
This article lists all the electronic components, 3D printed parts, and hardware that I needed when assembling JetBot.
To avoid everyone taking detours, I will also list the detailed model parameters.

First, let's take a look at the "零件全家福" to get an overview:

robocarstore/173807775925330624

Here is the list of all parts and model parameters:

robocarstore/173807779624892425

In the installation process, I also used some tools, such as: M3 wrench, M2 wrench, M3 hex nut wrench, cross screwdriver, flat screwdriver, high temperature tape, soldering iron (some parts need to be soldered).

以上,就是我组装的这台JetBot用到的所有零件和工具。

Of course, you can also refer to the detailed Nvidia official Git part list, which proposes some other part solutions:
https://github.com/NVIDIA-AI-IOT/jetbot/wiki/bill-of-materials

Next, I will introduce how to install JetBot step by step.

to be continued…

Play with JetBot Autonomous Driving (2) Assemble Jetbot Car

robocarstore/173807852624587444

This article will detail the hardware installation process of JetBot, and provide a full installation video.

Due to the main camera malfunction during filming, the video content is unavailable, so only the material from the secondary camera is used, and the quality is somewhat unsatisfactory. Please forgive me.

You can also refer to the installation process of the official Git to complement the shortcomings (some pictures in this article are also from here):
https://github.com/NVIDIA-AI-IOT/jetbot/wiki/hardware-setup

Required Tools

M3 wrench, M2 wrench, M3 hex nut wrench, cross screwdriver, flat screwdriver, insulating tape, high temperature tape, 3M double-sided tape, soldering iron (some parts need to be soldered).

Start Assembling

Step – 1 Install Wireless Network Card

1,Remove the chip module (the entire module with the heatsink) from the Jetson Nano

First, unscrew the 2 screws, then pull the side lock (侧锁) apart, the chip module will automatically pop up at an angle, slide the chip module out along this angle. robocarstore/173807821424761926 robocarstore/173807825424765927 robocarstore/173807827724901728 robocarstore/173807828824814429

2,Install WiFi Module AC8265

Connect the Intel WiFi module AC8265 to the antenna, wrap it with high temperature tape to reinforce it, avoid falling off, and cut the high temperature tape on the groove. Screw the screws of the Jetson Nano base, plug the WiFi module into the WiFi slot, and screw the screws back in to fix the AC8265 WiFi module. robocarstore/173807831124775830 robocarstore/173807831924893431 robocarstore/173807832725044032 robocarstore/173807836024830233

3,Install the chip module back to the Jetson Nano base, and fix the antenna

Plug the chip module back into the slot, press flat, the side lock (侧锁) will automatically snap back in place, screw the 2 screws back in to fix the chip module, and then use high temperature tape to fix the antenna to the heatsink. robocarstore/173807836924645634

robocarstore/173807838324670435

robocarstore/173807839225296536

Step – 2 Connect Power Line to Motor Driver

4,Solder the Motor Driver Module

Here you need to solder, when you buy this motor driver module, some accessories will be included, you only need to solder the interface shown in Figure 1, and the final processing is shown in Figure 4.

robocarstore/173807841224729437

robocarstore/173807842224823038

robocarstore/173807843724698939

robocarstore/173807844433350340

5,Unwrap the Positive and Negative Poles of the MicroUSB Power Line

As shown below, peel off the positive and negative wires, and fix the other wires with insulating tape to prevent short circuits. Generally, it is red positive and black negative, if you are not sure, please refer to the MicroUSB data line connection diagram in the picture, use a multimeter to measure. You can also connect an LED light, use the characteristics of the diode, and turn on the power to test whether the positive and negative poles are correct.

robocarstore/173807845024671941

Note: The positive and negative poles must be clearly identified, if you get it wrong, it may burn your Jetson Nano, or even cause a power explosion.

Make sure to get it right!

Make sure to get it right!

Make sure to get it right!

Important things are said three times! If you have no experience, you must ask someone with experience for help!

6,Motor Driver Module Power Interface Connection to MicroUSB Data Line

First, look at the interface of this motor driver module, it is actually an integrated board of PCA9685 and TB6612.

robocarstore/173807849325676742

However, assembling JetBot only needs a few interfaces. This step only connects the MicroUSB data line as an external power line (3v3接_正极_、GND接_负极_).

robocarstore/173807851424798543

Step – 3 Install TT Motor

7,Install TT Motor

Prepare the 3D printed parts "chassis" (chassis.stl) and TT motor. Install the TT motor on the "chassis", fix it with M3 screws and M3 hex nuts, please be gentle, the 3D printed chassis is not as strong as you might think.

robocarstore/173807852624587444

robocarstore/173807854224561745

robocarstore/173807855324679046

Step – 4 Install Motor Driver Module

8,Install Motor Driver Module on the "chassis"

robocarstore/173807856624662147

First, use M2*6 self-tapping screws to install the motor driver module on the "chassis" (as shown in Figure 1).

Step – 5 TT Motor and Motor Driver Module Connection

9,TT Motor and Motor Driver Module Connection

According to the wiring method shown in the figure, connect the TT motor to the driver module (even if you connect it incorrectly, it is not a big deal, you can check whether the direction is correct in the subsequent application instance, and then adjust it).

robocarstore/173807858324621348

Note: In the installation video, the motor driver installation direction is different from the picture, please align with the direction shown in the article.

Step – 6 Install Wheels and Pre-connect Dupont Lines

10,Install Omnidirectional Wheels

Prepare the "caster shroud 60mm" (caster_shroud_60mm.stl), "caster base 60mm" (caster_base_60mm.stl), and polyoxymethylene ball (POM ball). Place the "caster shroud 60mm" -> polyoxymethylene ball -> "caster base 60mm" in the groove of the chassis, and then use "M2*8 self-tapping screws" to fix it. robocarstore/173807863324608149

robocarstore/173807865324939550

robocarstore/173807866124643751

robocarstore/173807867024781552

11,Motor Driver Module Pre-connect Dupont Lines

First, use Dupont lines to pre-connect the four pins on the motor driver module, which are: 3.3v, GND, SDA, SCL. Pre-connect it, wait for later use.

robocarstore/173807868126285253

12,Install the Left and Right Wheels

Please install the wheels carefully, so as not to exert too much force and crush the "chassis".

robocarstore/173807871924726254

Step – 7 Jetson Nano、OLED、电机驱动模块接线

13,Fix the Jetson Nano on the "chassis"

Use M2*6 self-tapping screws to fix the Jetson Nano on the "chassis". robocarstore/173807872924554455 robocarstore/173807875224607056

14,OLED Display Pre-wiring

Before connecting the wires, we need to use long double-row bent pins to weld the OLED Display (of course, you can also directly weld Dupont lines). robocarstore/173807876024663757 robocarstore/173807877324632258

15,OLED Display and Motor Driver Module Connection

First, understand the pin of the OLED Display.

robocarstore/173807879224744959

Then refer to the wiring diagram shown below, connect the OLED Display and the motor driver module.

robocarstore/173807879924605060

16,OLED and Jetson Nano Connection

Plug the OLED into the pins shown in the figure (the pins of the OLED Display are one-to-one corresponding), and install it according to Figure 2. robocarstore/173807881124578461 robocarstore/173807883024886862

Step – 8 Install Pi V2 Camera

17,Fix the Camera on the "chassis"

First, use M2*6 self-tapping screws to fix the Pi V2 camera on the "camera mount" (camera_mount.stl), then connect the video line to the Jetson Nano, and finally use M2*6 self-tapping screws to fix the "camera mount" on the "chassis". robocarstore/173807883824550163 robocarstore/173807885124829464 robocarstore/173807885824666465

Step – 9 Install Mobile Power

18,Install the Mobile Power in the "chassis"

This is the last step, and also the simplest step. Put the mobile power into the power slot, and fix it with tape or 3M double-sided tape.

robocarstore/173807886524635366


The next article will introduce how to burn the Jetson Nano system onto the MicroSD card.

to be continue……